
Since gvSIG 2.3, when a shapefile has corrupt geometries it is loaded in the Table of Contents (ToC) but not in the View, but we can have the option to correct that layer. One of the reasons is that if the layer with corrupt geometries was loaded, and the user edited that layer, saving editing with those errors it could cause problems and lose data. To avoid this the decision has been to load it in the ToC but not to load the geometries, and inform the user.
If after adding the layer in the View we see that it is added in the ToC but it is deactivated and marked with a red exclamation point, and an error message appears in the lower left part of the screen, it is a sign that it is a layer with errors.
 It may happen that the layer has been loaded without problems in the view initially, but if all the records are not read, there has been any error. Then when performing any subsequent operation (it can simply be a zoom) the corrupted geometry is detected and the layer is deactivated, showing the red exclamation mark.
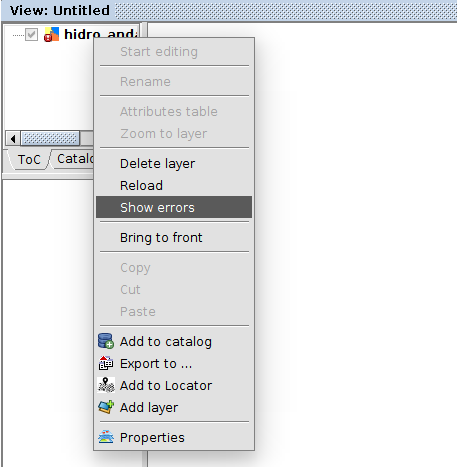
In order to see the details of the error we will activate layer, and with the secondary button of the mouse we will select “Show errors”.
In the new window that is opened we can have information about which geometries are corrupt, with a message similar to this: “There were errors loading the feature ‘x’ from ‘[layer_name]'”, where “x” will be the geometry number (we must take into account that the first geometry is “0”), and “layer_name” will be the name of our layer.
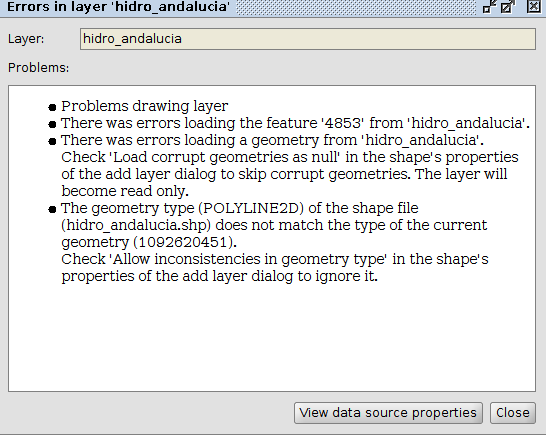 This window will also indicate what type of error is, and what we should do. The errors can be related to the number of vertexes of a line or a polygon for example, if we have a line with an only vertex or a polygon with two vertexes, that is not correct. In that case we will see a message similar to this: “Invalid number of points in LinearRing (found 3 – must be 0 or> = 4).”
It can also give us instructions about if it is possible to solve it. For example, the message “Check ‘Fix LinearRings and LineStrings’ in the shape’s properties of the add layer dialog to try fix it” may appear.
If we get this message, we can try to correct the layer. From the previous window we will access to its properties by clicking on the lower button “_View_properties_of_data_source” (or its corresponding translation).
Note: For the moment in gvSIG 2.3 and 2.4 this option is only available for shapefiles. For the rest of vector formats it will be necessary to delete the layer at the View and add it again, and then access to its properties from the “Add layer” window.
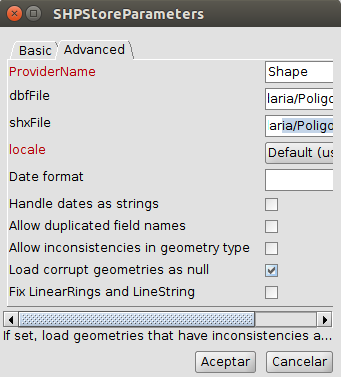
In the layer properties window we will access to “Advanced” tab and we will follow the steps that the error message indicated.
 There will be several options to fix the error.
Correction of geometries when they have less points than needed
If the error message inform us about which geometry was corrupt, and it indicates us to mark the “Fix LinearRings and LineStrings” option, at the “Advanced” tab we will mark it, and we will accept, and in the View we will click with the secondary button on the active layer and we will press “Reload”. In this way we will see the elements of the layer in the View, and duplicated vertexes will be added at the end of the geometries that had less points than needed.
Correction of geometries with another type of error
If we have corrected a geometry that had less points than needed, we said that gvSIG duplicates the necessary points for the geometry to load it well, but after being fixed automatically it can remain a polygon with three points where two of them coincide. In that case we may want to know why the geometry was wrong and correct it if it’s possible.
When we have seen the initial information of the error, the message has indicated which geometry was corrupt. We would then open the attribute table, and we would look for the register indicated in the error. As the records start from “0” in the code, and in the attribute table they starts from “1”, we will have to add “1” to the record indicated in the error. For example, if it indicated the geometry number “5” we will look for the element “6” of the attribute table.
After selecting the element we will make a Zoom to the selected feature, and we will see the corrupted geometry on the View. The next step will be to put the layer in editing mode and correct the geometry.
Depending on the initial error message, we will try to correct it in one way or another. Some of the possible ways to correct the geometries would be the following:
- If it is a polygon layer and we have a geometry formed by two points, we can delete it and create a new polygon or we can add more vertexes. The same if it is formed by a point.
- If it is a polygon layer where we have a multipolygon geometry, and one of the polygons of of that multipolygon is really a point or a line, we would use the “Explode geometry” tool first and we would delete the excess parts or we would correct them.
Once the geometries are corrected, we won’t be able to save the layer that we are editing. The application will force to export to a new layer when finishing editing. With this, the new layer will be loaded correctly on the View.
Elimination of corrupt geometries
If we want to remove the corrupt geometries directly, we will mark the “Load corrupt geometries as null” option at the “Advanced” tab. Then we will accept, and on the View we will click with secondary button on the active layer and we will press “Reload”. In this way we will see the elements of the layer in the View.
The next step will be to put the layer in editing mode. Then we will open its attribute table, and we will go to the Table->Properties menu. We will see the different fields of the layer at the new window. We will mark the GEOMETRY field as visible, and we will accept later. So, if we go to the last column in the table we will see that it is the field that contains the geometry.
The next thing is to put the GEOMETRY field active and sort it in descending order, so that at the top we will see the records that do not have geometry (the value at GEOMETRY field is empty).
 The corrupt geometries will be among the records where the GEOMETRY field is empty, but we must take into account that if we have more than one record with the GEOMETRY field empty, it is possible that any of these geometries is correct. For example, if we have worked with a database previously, it’s easy to have null geometries on it, so exporting that database to SHP, those records would be kept and they wouldn’t be an error really. If we only have a null geometry in the table, it will be the one with the error.
By having the layer in editing mode, we could select the records that we want to delete in the table directly, and we would click on the “Remove row” button (also available in the Table menu), which would eliminate the desired geometries.
Finally we will finish editing, where the application will force us to save it as a new layer on disk. In this way we will have the corrected layer, without the geometries that were corrupted.


Pingback: Correction of shapefiles with errors in gvSIG Desktop – GeoNe.ws