
Today we are going to see information tools, focusing on learning to use the “Hyperlink” tool.
There are 4 main information tools: information by point, consulting area, consulting distance and hyperlink. We would be able to add other ones like “Google Street View” that allows us to consult the images of this Google service… besides in this case there aren’t Google cars riding in the Game of Thrones landscape yet.
These 4 tools are available from the toolbar:

The first three tools are very intuitive and you can test them just only explaining their working.
Information by point: it gives us information about the element that we click on, having its layer active. It will show a window with the values of that element from the attribute table. For example, if we have “Locations” layer selected and we press on the point that represents “King’s Landing”, the next window will be opened:

Consulting area and distance tools work in a similar way. Once the tool is selected, we click on the View, and we will see the information about area and perimeter in one case, and about partial and total distance in the other case. This information is shown in the lower part of the screen, at the state bar (where we can see another information like scale, coordinates or units).
![]()
The hyperlink is more complex because the settings have to be configured previously at the layer “Properties”. We are going to see a practical example:
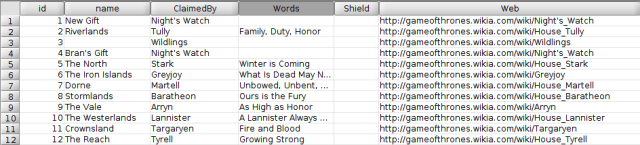
Reviewing the previous post, “Editing Tables”, we are going to add a series of links to websites about houses of Game of Thrones. They will be added to the “Web” field of the attribute table of “Political” layer:
- Tully: http://gameofthrones.wikia.com/wiki/House_Tully
- Wildlings: http://gameofthrones.wikia.com/wiki/Wildlings
- Night’s Watch: http://gameofthrones.wikia.com/wiki/Night’s_Watch
- Stark: http://gameofthrones.wikia.com/wiki/House_Stark
- Greyhoy: http://gameofthrones.wikia.com/wiki/Greyjoy
- Martell: http://gameofthrones.wikia.com/wiki/House_Martell
- Baratheon: http://gameofthrones.wikia.com/wiki/House_Baratheon
- Arryn: “http://gameofthrones.wikia.com/wiki/Arryn
- Lannister: http://gameofthrones.wikia.com/wiki/House_Lannister
- Targaryen: http://gameofthrones.wikia.com/wiki/Targaryen
- Tyrell: http://gameofthrones.wikia.com/wiki/House_Tyrell
Results will be similar to these ones:
Now we are going to indicate to the layer that the “Web” field contains links to websites.
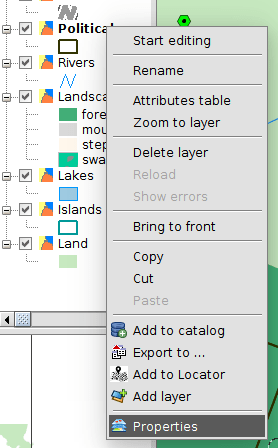
To open the Layer properties window we click on the layer name with the secondary button of the mouse at the Table of Contents, or we access from the “Layer/Properties” menu, having the layer active.
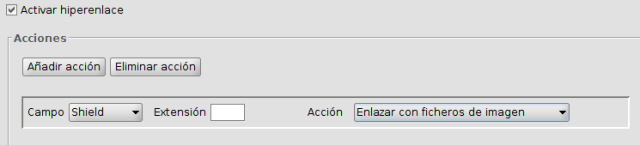
At the new window we go to “Hyperlink” tab, the tab that we are interested in now.
We press “Enable hyperlink”, and we select the “Web” field and the “Link to text and HTML files” action.
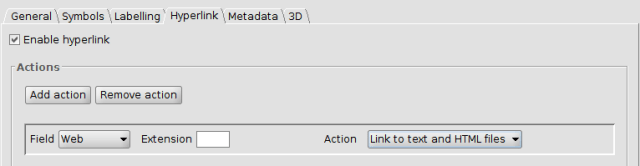
Now we can close this window already, clicking on the “Accept” button and we can start to use the hyperlink button on the “Political” layer.
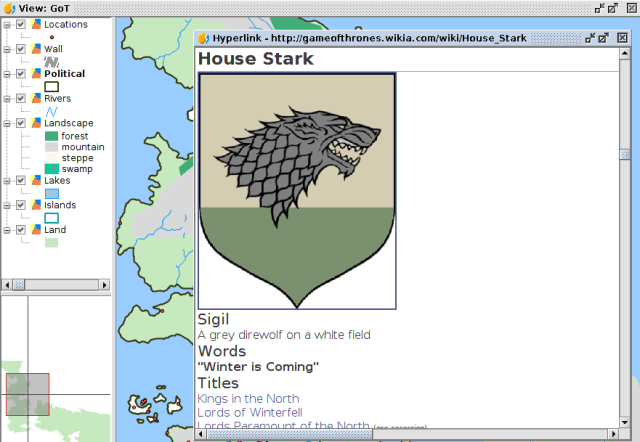
What happens when we click on an element? …a browser is opened (that by the way it will be improved in the next version) with information about the web page indicated at the attribute table. In this case we will get the information about each house. For example, when we click on “The North” kingdom it will link to the information of the House Stark:
Now we are going to create another type of hyperlink, that will open an image that we have in our computer. In our case, we will see the shield of every house, that you can download from this zip file.
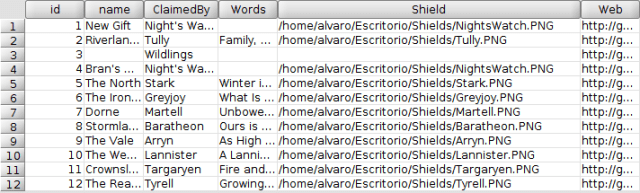
For that, firstly we are going to start editing mode at the “Political” layer and we are going to add the information about the path to the images in your computer, in the “Shield” field. For example:
- /home/alvaro/Escritorio/Shields/Arryn.PNG
- /home/alvaro/Escritorio/Shields/Baratheon.PNG
- /home/alvaro/Escritorio/Shields/Greyjoy.PNG
- /home/alvaro/Escritorio/Shields/Martell.PNG
- /home/alvaro/Escritorio/Shields/NightsWatch.PNG
- /home/alvaro/Escritorio/Shields/Stark.PNG
- /home/alvaro/Escritorio/Shields/Tully.PNG
- /home/alvaro/Escritorio/Shields/Lannister.PNG
- /home/alvaro/Escritorio/Shields/Targaryen.PNG
- /home/alvaro/Escritorio/Shields/Tyrell.PNG
Table will be like this one:
Such as we’ve done previously, we define the hyperlink settings, indicating that the field will be “Shield” and the action will be “Link to image files”:
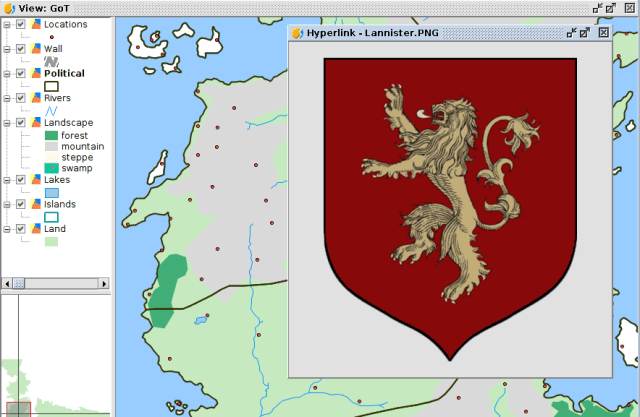
If we check the “Hyperlink” tool, each time that we link on an element of the “Political” layer, an image will appear on a new window with the shield of the corresponding House. At that way, if we press on “The Westerlands” we will see the Lannister shield:
And as we pay our debts too, we invite you to read the next post of this peculiar course about GIS.


This is great! Thank you for the tutorial and examples!