Exercises of the Scripting Workshop at the 10th International gvSIG Conference

Hi there,

In this post, you will find the examples made in the workshop for beginners about Programming with Scripting Module in gvSIG 2.1 at the 10th International gvSIG Conference in December at Valencia.

During the workshop, we saw a few examples of geoprocessing, starting with the calculation of a buffer area and little by little, adding functionalities according to our needs.

Here the cartography to follow the scripts.We only need a polygone layer and a point layer. You can use your own layers if you want.S

If you don´t know the Scripting Module, we explain how to load the scripts, step by step, at this video. In the code, you only should change the part as ‘initial data’, writing the path where the new lawyer will be recorded. These scripts will not modify the layers already loaded. For the correct running, we should have the View on and one layer selected.

In the first two examples, we can see first, the creation of a buffer area and secondly, adding a new field showing the distance between those points to a reference point.

Script 1: Buffer

Script 2: Buffer and new field with spatial information

taller_scripting_ejer_02

Script 2

Also, in the third example, we add a spatial condition. This condition is just that it creates the buffer in those points intersecting with some polygon from the selected layer. In the example, referred to ‘manzanas’, but it can be replaced for any polygon layer. We can see in the symbology how this variable evolves, thinking that the reference point from the example it would be at the left bottom side. We also see that there are points where the buffer has not been generated.

Script 3: Buffer, distance new field and complying the intersection.

taller_scripting_ejer_03

Script 3

Another function is, from a point layer, to create a new line layer containing (in this case, a single entity to help us) a geometry with the union of all the points with all the vertices of the line.

In the first example, passing the vertices using the order of an ID field which would be random, and in the second one, using the buffer layer created in the 3rd script and taking as an order, the distance field to create the vertices of the line geometry.

Script 4: Convert points to line

taller_scripting_ejer_04

Script 4


Script 5: Convert buffer layer line

taller_scripting_ejer_05

Script 5

Finally, an example not explained during the workshop is the generation of lines projecting to that reference point, taking into account the type of layer: points, lines or polygons.

Script 6: Projected lines

Script 6: Initial line layer

Capa inicial de polígonos

Script 6:Initial polygon layer

You can watch the workshop videos on the following links (Spanish/English):

  • Spanish: 10as Jornadas Internacionales gvSIG: Taller 5, Scripting en gvSIG 2.1:

https://www.youtube.com/watch?v=DFRUZh0CzbI

  • English: 10th Int. gvSIG Conference: Workshop 5, Scripting on gvSIG 2.1:

https://www.youtube.com/watch?v=fKkclGGTHKs

Any doubt, you can ask here, at gvSIG user list or if it is a more specific one, you can contact me: omartinez@gvsig.com

If you are interested in the rest of the presentations of the Conference, you can check them out at this listing.

I hope these examples were useful.

Greetings to all and thank you,

Óscar

Posted in development, english, events, gvSIG Desktop, scripting | 1 Comment

gvSIG aplicado a Arquitectura

Hace unas semanas se celebraron las 10as Jornadas Internacionales gvSIG en Valencia (España), en las que se presentaron una gran cantidad de ponencias de temáticas distintas. En ellas hubo una sesión dedicada especialmente a arquitectura, en la que se presentaron varias ponencias con temas distintos como Sistemas de Información Geográfica en un despacho de arquitectura, licencias urbanísticas, o certificados de eficiencia energética, todos ellos proyectos muy interesantes.

Están disponibles tanto las presentaciones como la grabación de las mismas. Las ponencias que se presentaron relativas a arquitectura fueron concretamente:

– Los SIG aplicados a la gestión de proyectos en un despacho de arquitectura (PDF: 8.0 MB); VICENTE J. VALERO (Grado en Arquitectura Técnica)

– Sistemas de Información Geográfica para el Control de Licencias Urbanísticas (PDF: 4.7 MB); PABLO PERUCHO (Grado en Arquitectura Técnica)

– Aplicación de los SIG a los certificados de eficiencia energética en la localidad de Llíria (PDF: 5.4 MB); MIGUEL ÁNGEL SIMEÓ (Grado en Arquitectura Técnica)

– Metodología Multicriterio Para La Búsqueda De La Ubicación Óptima De Un Emplazamiento Público (ODP: 10.7 MB; PDF: 4.1 MB); RUBÉN HERNÁNDEZ (Grado en Arquitectura Técnica)

– Ruegos y preguntas de dicha sesión:

¡Esperamos que os sea útil esta información!


Posted in events, gvSIG Desktop, spanish | 4 Comments

Cursos de usuario de gvSIG gratuitos

A partir del 16 de febrero comienzan unos cursos online gratuitos de gvSIG Desktop, ofrecidos por la Fundación Fessia en colaboración con la Asociación gvSIG.

Con dichos cursos se obtiene la certificación de usuario y la certificación usuario experto en gvSIG Desktop de manera gratuita. El colectivo al que va dirigido es únicamente a trabajadores en activo del sector agrario, forestal y pecuario.

Para este curso hay disponibles 175 plazas para la certificación de usuario y 50 plazas para la certificación de usuario experto. ¡No dejéis pasar la oportunidad!

Para más información se puede consultar la web www.gvsig-fessia.com o remitid las dudas vía email a informacion@gvsig-fessia.com o a través del teléfono 644979959 (en horario de 09.00 h. a 14.00 h.).

Más información sobre fechas, en http://www.gvsig-fessia.com/wordpress/wp-content/uploads/2015/01/NOTA-DE-PRENSA.pdf

Posted in gvSIG Desktop, spanish, training | 1 Comment

Compiling and debugging an example plugin for gvSIG 2.1.0 from an IDE (NetBeans)

English translation of the article by Joaquin del Cerro.

Hi everyone,

I´m back to explain to you, how download the sources of one of the gvSIG project´s example and how compile it and debug it.

In this article, I will use as IDE Netbeans 8, which is the IDE that normally I use for developing with gvSIG long time ago. In the future, I will install an Eclipse and in another post I will tell you how to work with it. Anyway, if you are a developer used to Eclipse, it would not be difficult to take the explained ideas.

Keep in mind that this post doesn´t want to be a NetBeans tutorial, just to explain the steps to follow for being able to download and compile gvSIG plugin with it.

Once you have already followed the steps described in the post  “Como descargar y compilar gvSIG 2.1.0 en Linux y Windows“ and we have all the basic tools installed and set up, we can carry on.

To follow this post, we need internet access. In general, for compiling gvSIG we need internet access. And also:

  • An Installable of gvSIG, in my case “gvSIG-desktop-2.1.0-2262-testing-win-x86-standard-withjre.exe”
  • An Installable of NetBeans

First of all, we install IDE, NetBeans.

I´ve downloaded it from the NetBeans official website, in downloads:

https://netbeans.org/downloads/

We will find a few distributions availables for downloading:

  • Java SE
  • Java EE
  • C/C++
  • HTML5 & PHP
  • All

With the distribution “Java SE” will be enough for compiling the majority of gvSIG projects (excluding the ones requiring natives, because they are out of this post´s scope)

Simply we will download it and proceed to install it.

Through the initial set up, it will ask us for two things, where are we going to install it and where is the JDK to use. In this case, we will choose the JDK which we have already installed like it was explained in “Como descargar y compilar gvSIG 2.1.0 en Linux y Windows“.

Once we have installed NetBeans, we will install gvSIG. It will be a standard setup but we will not install it in “Program Files”;, I advise you to install it inside c:/devel, folder, where we have already downloaded the gvSIG sources. I have installed in :

c:/devel/gvsig/2.1.0-2262

The reason of installing it out of “Program Files” is because in my Windows installation, the user doesn´t have administrator privileges and if I do it in there, I will have problems later when I try to deploy the plugin binaries over that installation. Writing on c:/devel folder (created by me), I will not have any privilege problems at all.

Once we have these two things installed, we change the pathfile on “.gvsig-devel.properties” for pointing to the installation of gvSIG which we have just done in “c:/devel”.

Well, one more thing to do. The actual distribution for Windows of gvSIG-desktop doesn´t include a launcher in gvSIG.sh of gvSIG. The launcher is only included in Linux distribution( in future distributions we will include it as well for Windows). Well, for the moment is not present, so we have two options, if we have alredy compiled “org.gvsig.desktop”, we can take it from “org.gvsig.desktop/target/product” folder or if we don´t have it on hand, we can download it from:

http://devel.gvsig.org/svn/gvsig-desktop/trunk/org.gvsig.desktop/org.gvsig.desktop.framework/org.gvsig.andami/src/main/resources-application/gvSIG.sh

We will leave it in the folder where we have installed gvSIG, along with the “gvsig-desktop.exe”.

Once we have these three things, we will boot NetBeans, then, downwnload the project “org.gvsig.landregistryviewer” and we will compile it. We will download it from the url:

http://devel.gvsig.org/svn/gvsig-plugintemplates/org.gvsig.landregistryviewer/trunk/org.gvsig.landregistryviewer/

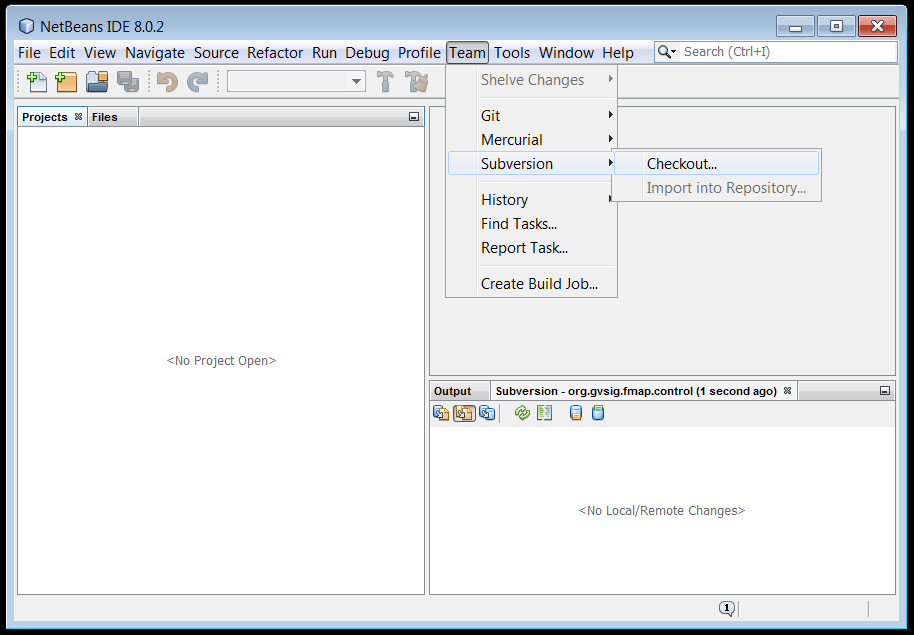
To do it, we will go to menu:

Team->Subversion->Checkout…

netbeans-checkout1 It will show us the following screen:

netbeans-checkout2

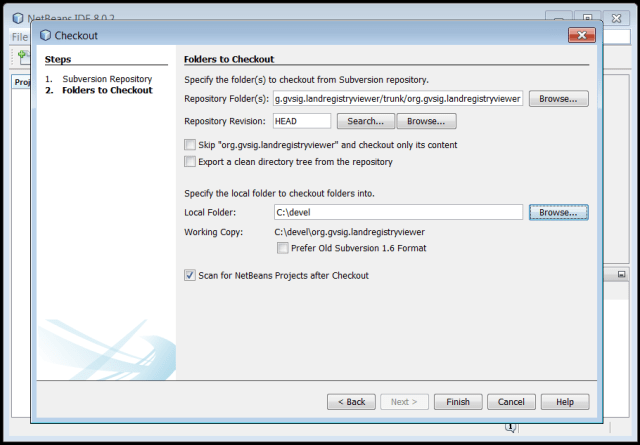
Then, we will write in the field “Repository url” the value of the url (previously indicated) in where is the example project “org.gvsig.landregistryviewer”. We click on “Next”. It will show us the next page of the assistant, in which we should introduce the folder where we want to download the project. In our case, we will introduce “c:/devel”, and click on “Finish”.

netbeans-checkout3

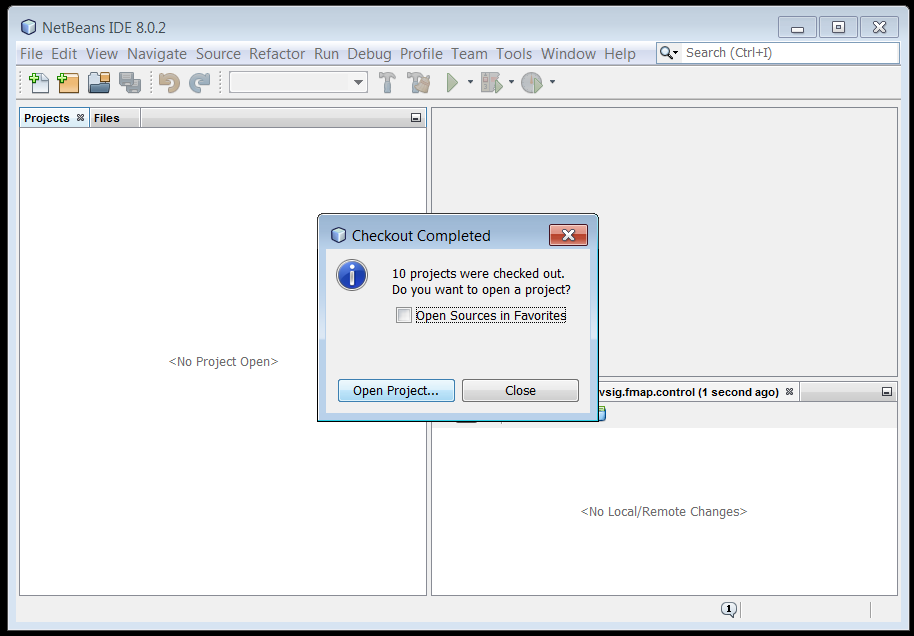
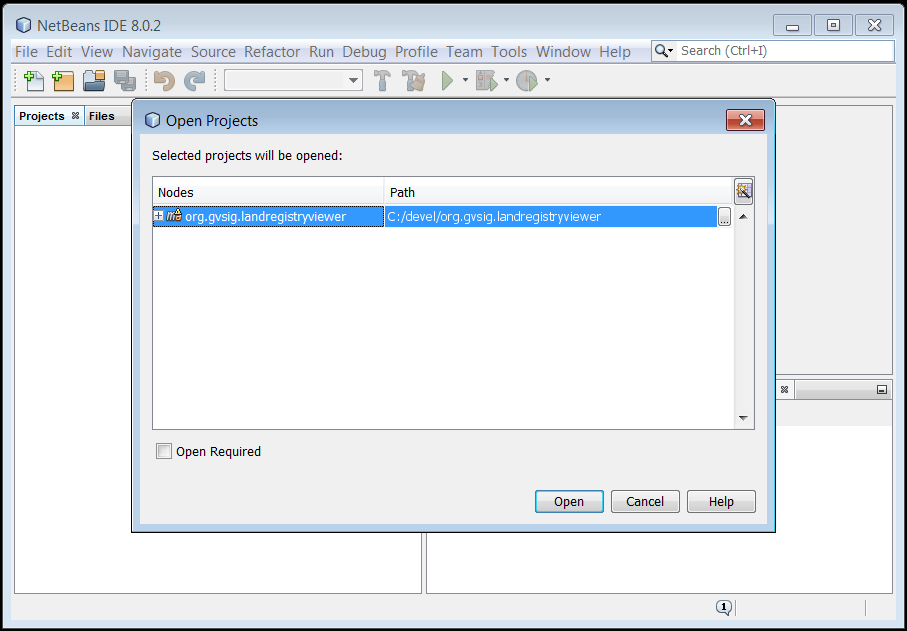
When the project´s download finish, it will tell us about the maven projects presents in the donloaded project and it will ask us if we want to open any of them. The screen dialogue will be something like:

netbeans-checkout4 
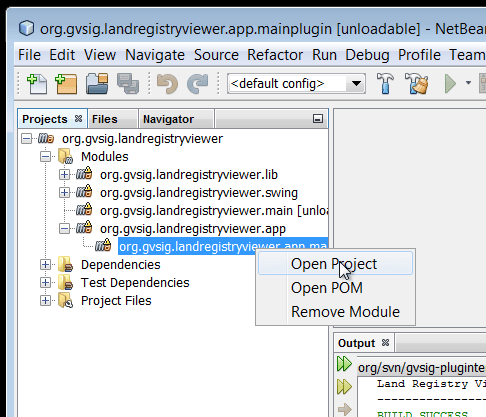
We click on “Open project…” to indicate which of the projects we want to open and it will show us:

netbeans-checkout5 We will select the project “org.gvsig.landregistryviewer” and click on “Open”.

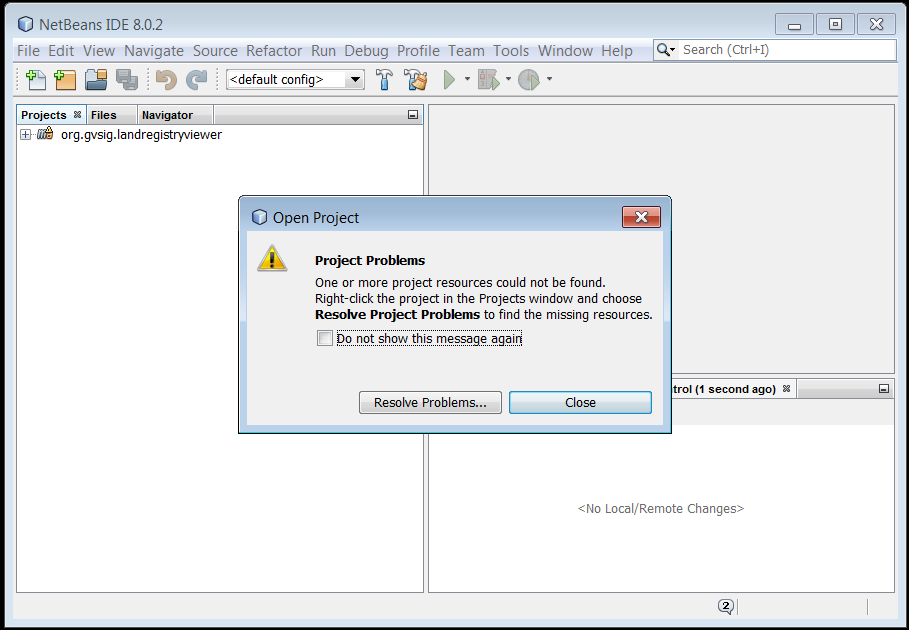
When we try to load the project for the first time, probably some error will appear due to the fact that some dependencies are not downloaded, showing us a message like:

netbeans-checkout6 We only clik on “Close”.

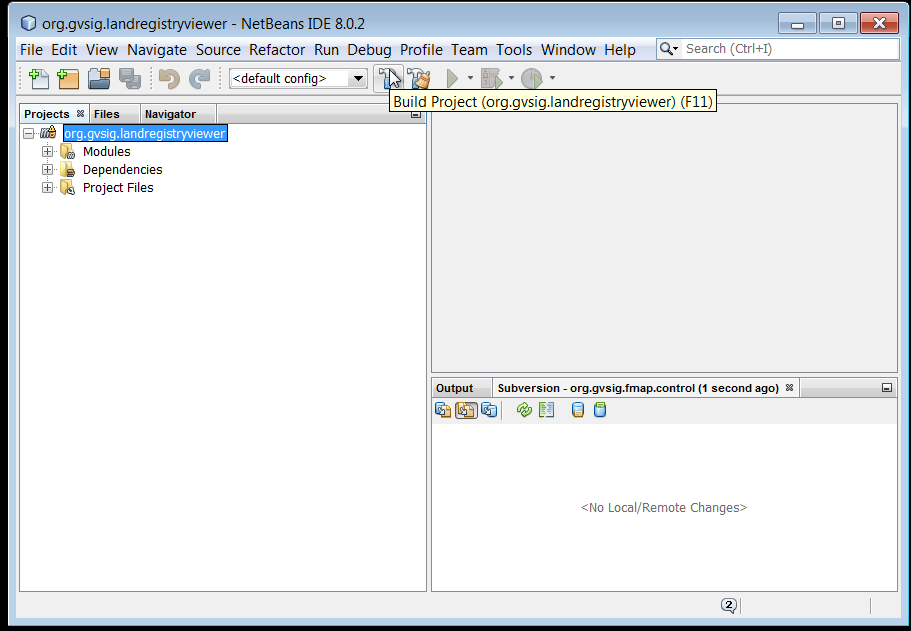
Now, we will compile the downloaded project. To do that, we select it in the “proyectos” view and click on “Build project” of the toolbar.

netbeans-checkout7 
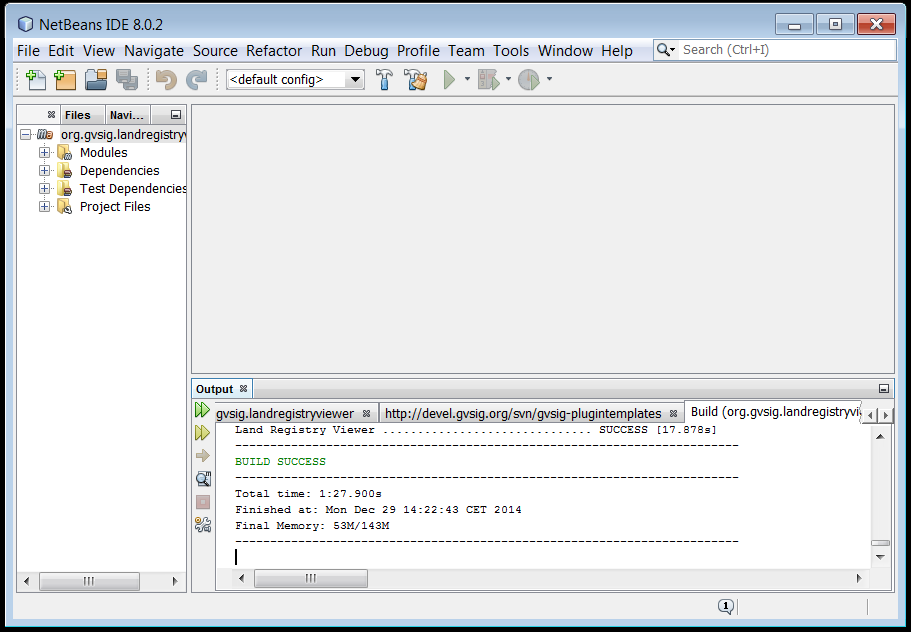
The bottom console will be showing the compiling messages and once the process finishes, we will have our plugin compiled and deployed over the gvSIG installation.

netbeans-checkout8

So far, we have seen how to prepare our work environment, download and compile the plugin. If we want to see our plugin in action, simply we will boot Console2, go to gvSIG installation folder, c:/devel/gvsig/2.1.0-2262, and run gvSIG.sh.

$ cd c:/devel/gvsig/2.1.0-2262
$ ./gvSIG.sh

Let´s see how to debug our plugin.

We will open the subproject “org.gvsig.landregistryviewer.app.mainplugin”.

netbeans-abrir-proyecto1 
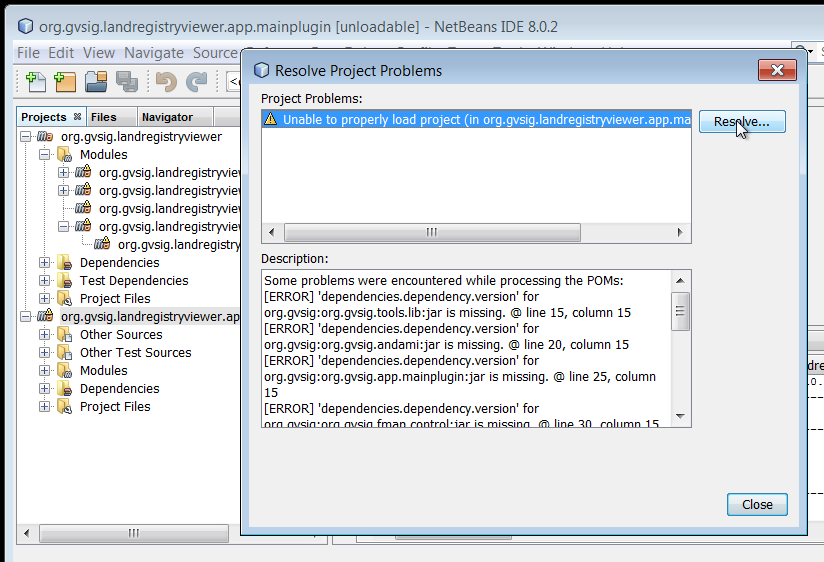
It could happen that the plugin doesn´t realise that there are all the dependencies needed, already downloades when the project has been compiled.If this happens, iw will show us:

netbeans-abrir-proyecto2 In this case, we click on “Resolve Problems…” for updating the dependencies. It will show us:

netbeans-abrir-proyecto3 We click on “Resolve…” and wait until the project update. When the update is finished, the atención signal should dissapear and we will close the dialog clicking on “Close”.

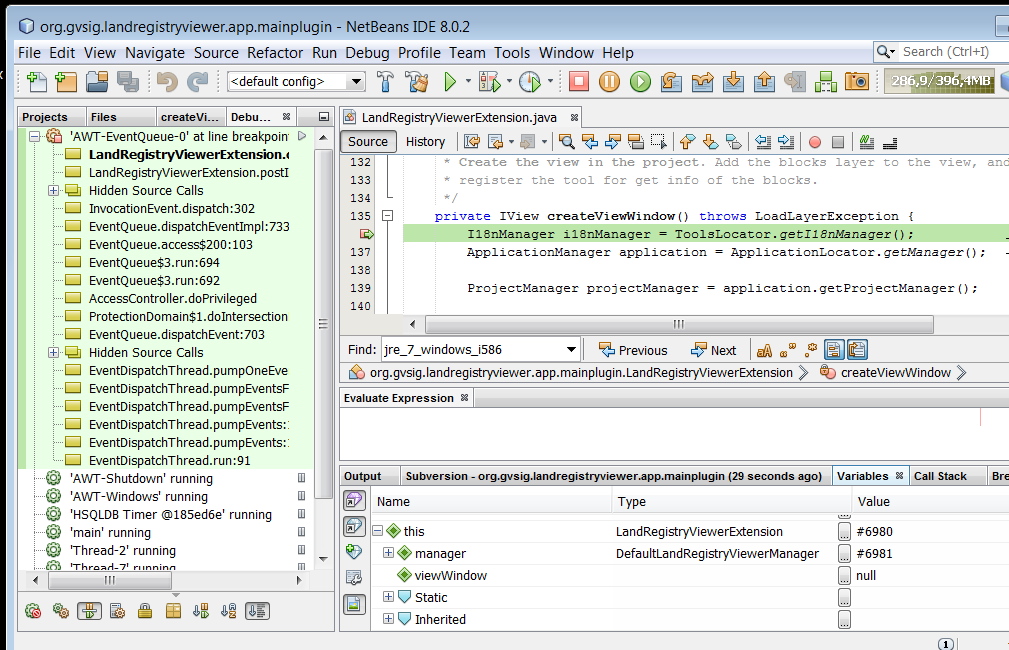
Now, we will load the class LandRegistryViewerExtension and put a breaking point at method´s start CreateViewWindow. To do this, we click twice in the line´s number.

netbeans-debug1 
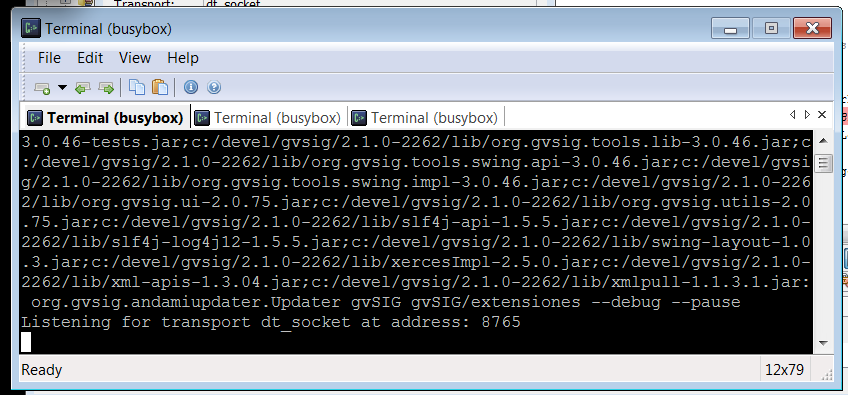
Once done the breaking point, we will go to Console2 and we will go to boot gvSIG, but passing before the parameters “–debug –pause”.

netbeans-debug4 This boots the JVM activating the debug for being able to connect with it.

netbeans-debug5 It is possible that depending of the firewall setting, it will show us a message or even that doesn´t work. We need to make sure that we allow the app java.exe to access to 8765 port.

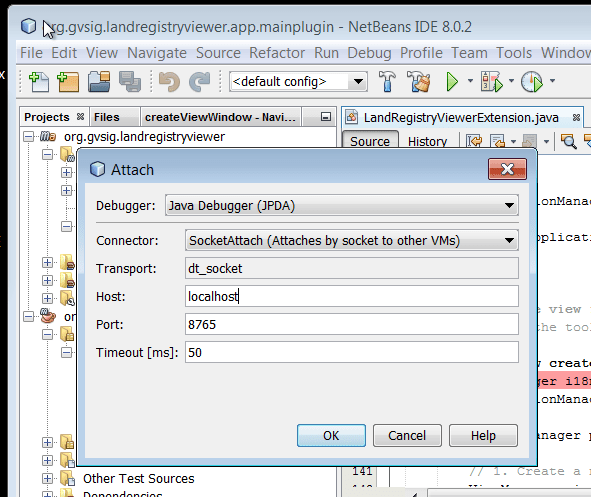
Then, we will back to NetBeans, and connect to gvSIG in debug mode.

netbeans-debug2 It will ask us for connection data…..

netbeans-debug3 When click on “OK”, it will carry on with the running of gvSIG in debug. As we have put a breaking point, it will stop on it and we will be able to debug our plugin.

netbeans-debug7 
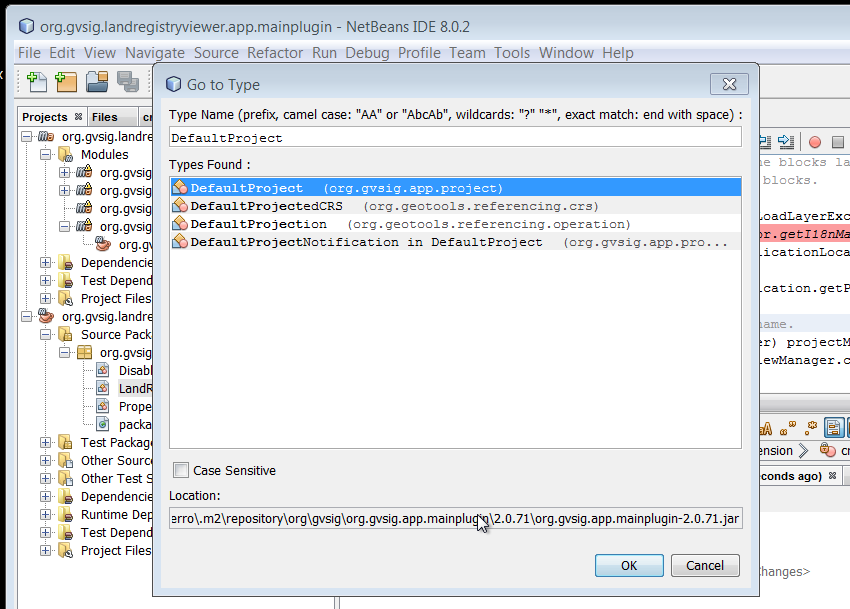
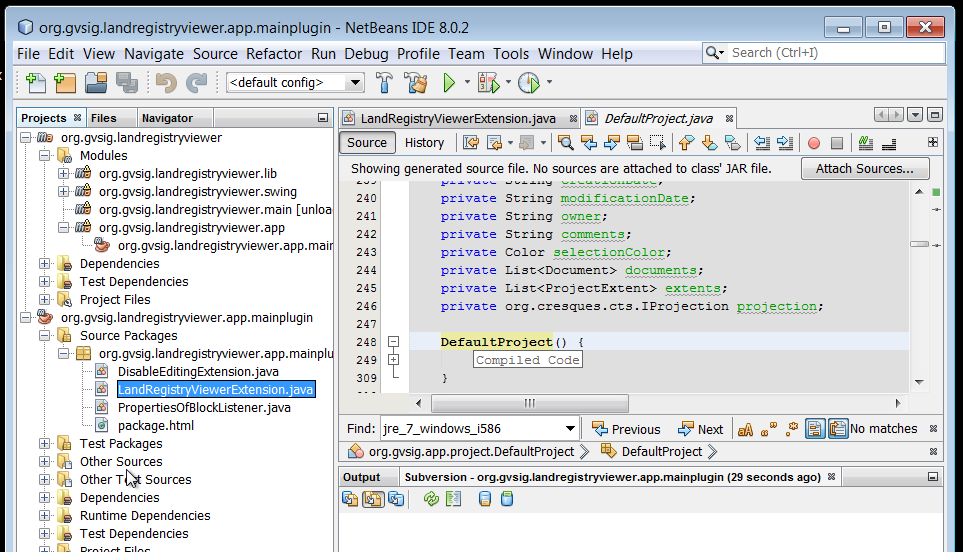
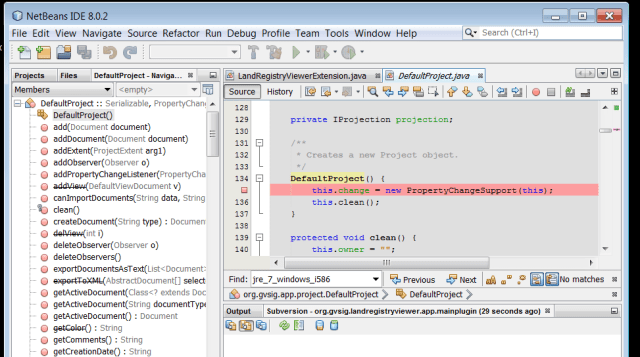
If we need to see the code of gvSIG, we click on Ctrl-O and type the class name which we want to locate.For instance, if wew want to put a breaking point in the proect creation, we will type Ctrl-O y “DefaultProject”

netbeans-debug8 And click on “OK”.

netbeans-debug9 
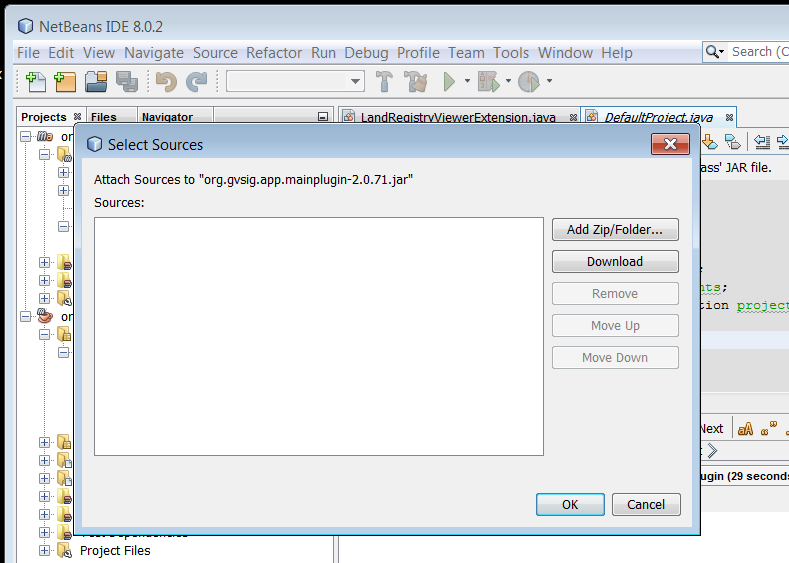
If it doesn´t show us the source code (automatically downloaded, well, depending of our NetBeans setting), we can click on “Attach Sources…” and then “Download”.

netbeans-debug10 
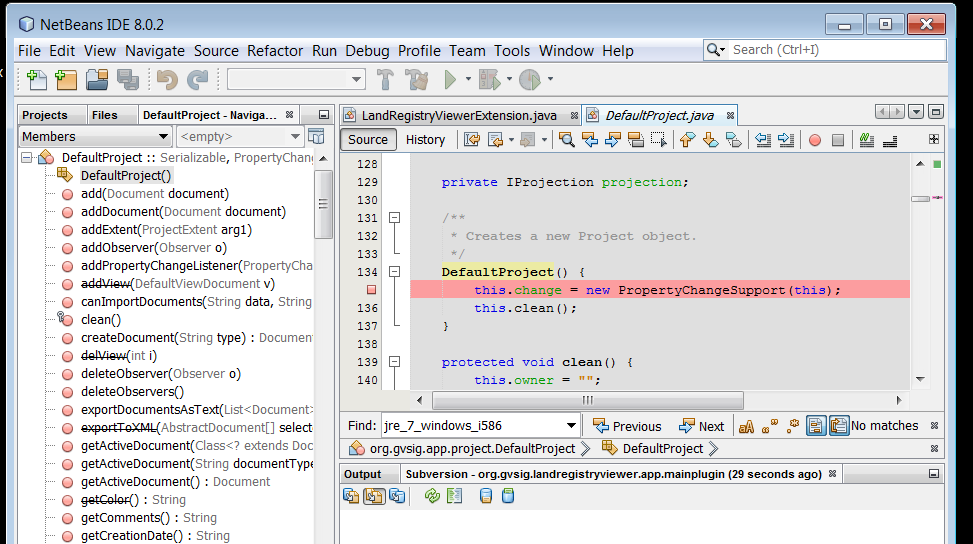
Once all the sources needed have been downloaded, we close the window clicking on “OK”. It will show us the code for the class “DefaultProject” and we can put a breaking point in its builder.

netbeans-debug11 Well, that´s it for today…..

All I have talked about is related to Windows 7. For Linux developers, it´s quite easy to follow and you just need to change the path c:/devel for the one that you use to leave the sources.

For Eclipse developers, the steps to follow are similars, the most complicated issue could be the support setting of maven which has already NetBeans.

It´s a post quite long (a lot of screenshots), but I think that they could be helpful to follow up the article.

I hope it was useful,
Greetings to all and thank you!

Posted in development, english, gvSIG Desktop, gvSIG development | 1 Comment

How to download and compile a gvSIG 2.1.0 plugin

English translation of the article by Joaquin del Cerro.

Hello again,
In the previous article, Como descargar y compilar gvSIG 2.1.0 en Linux y Windows “How to download and compile gvSIG 2.1.0 on Linux and Windows” I left some stuff unclear. Among them, I didn´t comment at all on how to download and compile a gvSIG plugin.

Assuming that we have already been able to install and set up the development tools mentioned in the article, from that point, compile a plugin is pretty simple, the most complicated issue it could be to get the plugin sources to compile.

In the gvSIG project, as a platform for managing development projects tool, we use “redmine”, which can be found at:

In the “redmine”, we already have registered several projects, including the one for the gvSIG kernel, “Application: gvSIG desktop”. We can get a projects list at:

In almost all of them, we will find the url from which we can download the sources.
We have to consider that a “redmine” project can store more than one development project and this one, in turn, can contain several gvSIG plugins.

Let’s see now, how we would do to download and compile the gvSIG data provider for PostgreSQL.

Looking at the projects list, we will find one named “gvSIG data provider for PostgreSQL”.
We click on the link and it will show us the project page in the redmine. Right there, we will have a link that says something like:

SVN: http://devel.gvsig.org/svn/gvsig-postgresql

We surf to it, and we will find an url like:

http://devel.gvsig.org/svn/gvsig-postgresql/trunk/org.gvsig.postgresql/

We will have a “pom.xml” file, which would be the root of our plugin project. We have to get used that gvSIG projects are multimodule maven projects.

To compile it and run it is pretty simple.
First, we will need to have a previously installed gvSIG 2.1.0. We can use a normal installation of gvSIG or the gvSIG binaries that they were generated as described in the previous article.

If we already have them, we should go to our user HOME and check if there exists a file “.gvsig-devel.properties”. This file contains the path where to find our gvSIG installation to deploy in it the gvSIG binaries plugins that we will compile. If we have compiled the gvSIG kernel in that process, it will be have been created with the appropriate values. We will have in it, something like:

~ $ cd
~ $ cat .gvsig-devel.properties
#Fri Dec 12 00:13:47 CET 2014
gvsig.product.folder.path=C\:/devel/org.gvsig.desktop/target/product
~ $

If we do not have the file already created, simply we will just create it, allowing the entry “gvsig.product.folder.path” point to the gvSIG installation on which we want to deploy the plugin.

Once all of this has been set, simply we will open our Console2 with Busybox (already set up) and run:

~ $ cd c:/devel
~ $ svn checkout http://devel.gvsig.org/svn/gvsig-postgresql/trunk/org.gvsig.postgresql/
... exit svn command...
~ $ cd org.gvsig.postgresql
~ $ mvn install
... exit install command...

If we are in Linux, we only change the command “cd” to adapt to the folder where we want to leave the sources.

Well, this process downloads the sources, compiles them and deploys the binaries of our plugin on the folder which we will indicate in the file “.gvsig-devel.properties”.

On the one hand it will leave us:

    • In gvSIG/add-ons the plugin already installed and ready to be loaded at the next start of gvSIG.
    • In install the package with our plugin “.gvspkg” if we want to hand it to another user to install it with the Plugin Manager.

Now, we just have to start the gvSIG and it will boot with our plugin.

Keep in mind that if deployed on a gvSIG binaries generated from the source, to boot gvSIG we should boot it running the gvSIG.sh file (even in a Windows system), as it was remarked in the previous article, while if we want to deploy it in a standard installation, we will boot it as normally boots that distribution.

Well, that´s all for now.

As always, I hope that it would be useful for you.

Shortly, I will try to talk about “How to work with an IDE and debug gvSIG”/como trabajar con un IDE y depurar gvSIG.

Greetings to all and thank you

Posted in development, english, gvSIG Desktop | 1 Comment

Ejemplos realizados en el Taller de Scripting en las 10as Jornadas Internacionales de gvSIG

Buenas, teníamos pendiente de publicar los ejemplos realizados durante el Taller de Scripting en las 10as Jornadas Internacionales gvSIG el pasado Diciembre en Valencia.

Durante el taller vimos varios ejemplos sobre geoprocesos, empezando con el cálculo de un área de influencia e ir poco a poco añadiendo funcionalidades según nuestras necesidades.

Adjunto aquí la cartografía necesaria para seguir los siguientes scripts. Solo es necesario una capa de polígonos y una capa de puntos, podéis probarlos con vuestras capas propias.

Si no conoces el Módulo de Scripting, te explicamos paso a paso como cargar los scripts en este vídeo. En el código solamente deberéis de modificar la parte que aparece como ‘datos iniciales’, indicando la ruta donde se grabará la nueva capa. Estos scripts no modificarán las capas que tengáis cargadas. Para su correcto funcionamiento debéis tener la Vista activa y una capa seleccionada.

En los dos primeros ejemplos, podemos ver primero la creación de un área de influencia, y segundo, añadiendo un campo nuevo indicando la distancia de esos puntos a un punto de referencia.

Script 1: Buffer

Script 2: Buffer y nuevo campo con información espacial

taller_scripting_ejer_02

Script 2

Además, en el tercer ejemplo, añadimos una condición espacial. Esta condición es que solamente cree el área de influencia en aquellos puntos que intersectan con algún polígono de la capa seleccionada. En el ejemplo hace referencia a la capa ‘manzanas’, pero esta puede ser sustituida por cualquier capa de polígonos. Podemos ver en la simbología como evoluciona esta variable, pensando que el punto de referencia del ejemplo se encontraría en la parte inferior izquierda. También vemos que hay puntos donde no ha generado los buffers.

Script 3: Buffer, nuevo campo distancia y que cumplan la intersección.

taller_scripting_ejer_03

Script 3

Otra de las funciones que vimos fue, partiendo de una capa de puntos, crear una capa nueva de tipo línea que contuviera (en este caso una sola entidad para facilitar las cosas) una geometría con la unión de todos los puntos como vértices de la línea.

En el primer ejemplo pasando los vértices utilizando el orden de un campo ID que sería aleatorio, y en el segundo ejemplo, utilizando la capa de buffer creada en el script 3 y tomando como orden el campo de distancia para crear los vértices en la geometría línea.

Script 4: Convertir puntos a línea

taller_scripting_ejer_04

Script 4


Script 5: Convertir capa buffer a línea

taller_scripting_ejer_05

Script 5

Por último, un ejemplo que no dio tiempo de explicar durante el taller, la generación de líneas que proyectan a ese punto de referencia, haciendo distinción según la capa inicial sea de tipo puntos, líneas o polígonos.

Script 6: Líneas proyectadas

Capa inicial de líneas

Script 6: Capa inicial de líneas

Capa inicial de polígonos

Script 6: Capa inicial de polígonos

Podéis ver los vídeos del taller, en español e inglés, en los siguientes enlaces:

  • Español: 10as Jornadas Internacionales gvSIG: Taller 5, Scripting en gvSIG 2.1:

  • Inglés: 10th Int. gvSIG Conference: Workshop 5, Scripting on gvSIG 2.1:

Cualquier otra duda podéis preguntar por aquí, por las Listas de usuarios gvSIG o si es alguna duda concreta podéis contactar conmigo directamente en: omartinez@gvsig.com

Si estáis interesados en ver el resto de ponencias realizadas durante las Jornadas podéis consultarlas en el siguiente listado.

Espero que os sean de utilidad estos ejemplos.

Un saludo,

Óscar

Posted in development, events, gvSIG Desktop, scripting, spanish | 3 Comments

gvSIG 2.1: Biblioteca de símbolos de meteorología

Entre el gran número de novedades que encontraremos en gvSIG 2.1, además de todas las nuevas funcionalidades, migración de funcionalidades existentes en versiones anteriores y corrección de errores, el usuario de gvSIG encontrará un buen número de bibliotecas de símbolos que se unen a las ya existentes.

Estas bibliotecas de símbolos no vienen instaladas por defecto en gvSIG, ya que en muchos casos se trata de simbologías temáticas o específicas de determinadas áreas de aplicación; pero todas ellas van en la instalación base, con lo que no es necesaria la conexión a internet para poder instalarlas en nuestro gvSIG.

Hoy vamos a comentar una de estas librerías temáticas. Se trata de la denominada “Weather” y que permite integrar en gvSIG simbología para realizar mapas climáticos acorde al estándar definido por la Organización Meteorológica Mundial en su documento “WMO No. 485 – Manual on the Global Data Processing and Forecasting System Manual” (con versiones en inglés, español, francés y ruso).

Adicionalmente se ha tenido en cuenta el trabajo del grupo MetOceanDWG de OGC en relación a la simbología para representar la climatología.

Veamos en el siguiente vídeo como instalar la biblioteca “Weather”:

Posted in opinion | 3 Comments

Geocoding in gvSIG 2.1 using scripting and GeoPy

English translation of the article by Joaquin del Cerro.

Hi, I ‘m here again.
This time to speak about a very quick scripting .


A few days ago Oscar Martinez told me that he had seen a python library to access geocoding services , 
GeoPy ; but there was the problem that he was unable to use it in gvSIG … as it was designed for a newer python version than the one used in gvSIG.


While we were glancing , we realised that by changing few small things, it could become usable for the python version of gvSIG 2.1.0 .


To use
GeoPy you have just to install the library , which can be done by unzipping the  “geopy-1.7.1-patched-for-gvSIG-2.1.0.zip” file in the folder:

gvSIG/plugins/org.gvsig.scripting.app.extension/lib/

located in user home. If you have already executed gvSIG, it should be closed and restart .

In Linux you can find this folder in $ HOME , and for Windows in :

C: \ Document and Settings \ my_user
or
C: \ Users \ my_user

Once installed the library GeoPy it can be used quite simply. If you execute the gvSIG scripts “Composer” , and create a new one with the following code , then you can start testing without any problems.


from gvsig import *
from commonsdialog import *

from geopy.geocoders import get_geocoder_for_service

def main(*args):

  street = inputbox("Insert street","street")
  if street == None:
    return
    
  geolocator = get_geocoder_for_service("googlev3")

  location = geolocator().geocode(street)

  print(location.address)
  print((location.latitude, location.longitude))
 
  msgbox("Found:\n"+location.address+"\n"+str((location.latitude, location.longitude)))

You can perform more complex actions such as open a table containing street names and civic addressing, read them and go creating a shapefile with points provided by geolocalisation service, but for the moment you can go on playing with this.

Greetings to all

Posted in development, english, gvSIG Desktop, gvSIG development, scripting | Tagged , | 4 Comments

gvSIG 2.1: Biblioteca de símbolos de mapeo colectivo

“El territorio es el espacio socialmente construido”, con esta frase comienza el excelente “Manual de Mapeo Colectivo. Recursos cartográficos críticos para procesos de creación colaborativa” realizado por Iconoclasistas.

En este manual, con licencia Atribución-NoComercial-CompartirIgual 2.5, encontramos una simbología orientada a ser utilizada en los talleres de mapeo colectivo. Simbología que se aleja de la representación habitual de elementos geográficos para aportar una iconografía orientada a representaciones ideológicas.

Y aunque en origen la simbología diseñada está pensada para utilizarse de una forma más artesanal en los distintos talleres de mapeo, pensamos que puede ser muy interesante disponer de esta en un Sistema de Información Geográfica libre y que gvSIG sea también una herramienta para realizar este tipo de trabajos cartográficos colaborativos y de análisis de nuestra realidad social.

Por eso mismo ponemos a disposición de la comunidad, un nuevo complemento disponible para gvSIG 2.1, que no es otra cosa que una biblioteca de símbolos orientada al mapeo colectivo.

Esperamos que os guste.

A continuación os dejo un vídeo que muestra cómo instalar esta biblioteca (como es habitual, mediante el administrador de complementos).

Posted in gvSIG Desktop, spanish | Tagged , , | 11 Comments

Geocodificación en gvSIG 2.1 usando scripting y GeoPy

Hola, aquí estoy de nuevo.
Esta vez para contaros algo de scripting muy rapidito.

Hace un par de días Óscar Martínez me comento que había visto una librería python para acceder a servicios de geocodificación, GeoPy; pero tenía el problema que no podía usarla en gvSIG…ya que estaba pensada para una versión mas nueva de python que la que lleva gvSIG.

La cuestión es que estuvimos echándole un vistazo, y cambiando unas pequeñas cosas se podía adaptar para usarla en la versión de python que lleva gvSIG 2.1.0 .

Para usar  GeoPy simplemente hay que instalar la librería, cosa que podemos hacer descomprimiendo el archivo “geopy-1.7.1-patched-for-gvSIG-2.1.0.zip” en la carpeta:

gvSIG/plugins/org.gvsig.scripting.app.extension/lib/

que encontraremos en el home de nuestro usuario. Si tenemos ya arrancado gvSIG deberemos cerrarlo y volverlo a arrancar.

En Linux podemos encontrarla esta carpeta en $HOME, y en Windows en:

C:\Document and Settings\MI_USUARIO

O

C:\Users\MI_USUARIO

Una vez instalada la libreria GeoPy usarla es bastante simple. Si lanzamos el “Composer” de scripts de gvSIG y creamos uno nuevo con el siguiente código podremos empezar a hacer pruebas con ella fácilmente.


from gvsig import *
from commonsdialog import *

from geopy.geocoders import get_geocoder_for_service

def main(*args):

  calle = inputbox("Introduce la calle","Calle")
  if calle == None:
    return
    
  geolocator = get_geocoder_for_service("googlev3")

  location = geolocator().geocode(calle)

  print(location.address)
  print((location.latitude, location.longitude))
 
  msgbox("Encontrado:\n"+location.address+"\n"+str((location.latitude, location.longitude)))

Se pueden hacer cosas más complejas como, abrir una tabla de la que leer los nombres de calle e ir creando un shape con los puntos que nos devuelve el servicio de localización, pero de momento ya podéis ir jugando con esto.

Un saludo a todos

Posted in development, gvSIG Desktop, gvSIG development, scripting, spanish | 5 Comments