
We start a series of posts dedicated to one of the more interesting novelties of the new gvSIG Desktop version. It’s a series of new functionalities that will allow to create new symbol libraries easily, but also to package and distribute them to other users.

In gvSIG 2.0 we find a new basic symbols librarie, “gvSIG basic”, that contains a series of point, line and fill symbols that allow us to have a base to make our thematic maps. It’s very probable that we want to increase the group of symbols available for our projects but also for the group of users of an entity.
From the “Tools/Symbols/Browse symbols” menu we can view this basic symbol library with three tabs: Marker, Line and Fill. A similar window will appear when we access to the symbology properties of a layer, although in this case we only will see the options related to the symbol of the type of layer that we are working with (points, lines or polygons).

Until this version it was very laborious to create a new symbol library from a series of image files (for example .png or .svg), because the user had to import these symbols one by one. In gvSIG 2.0 we find a symbols importer that makes this task easier. In the same menu, “Tools/Symbols”, we find the option “Import picture marker symbols” that opens a window similar to this one:

We’re going to make a simple example to import symbols and create a new symbol library. In our case we’ve downloaded a series of symbols under the GPL license from the “Open Icon Library” website that we’re going to use for the example. The steps are:
-
In the section “Folder name for creating the symbols” we indicate how we want to name our new library. We write “Open Icon”. If we don’t want to have all the icons at the same root library, we can create subfolders. In this case we can classify the symbols in different subfolders for example: Amenity, Religion, Shop, Tourism and Transportation. We’ll start with the first subfolder writing: Open Icon/Amenity.
-
We press “Select images” and at the new window we look for the images that we want to import and we select them.
-
We indicate the size of the symbols by default.
-
We press the Import button.
A window will appear indicating that the import have been finished. Now we can check that the symbols have been imported correctly and in the folder that we indicated.
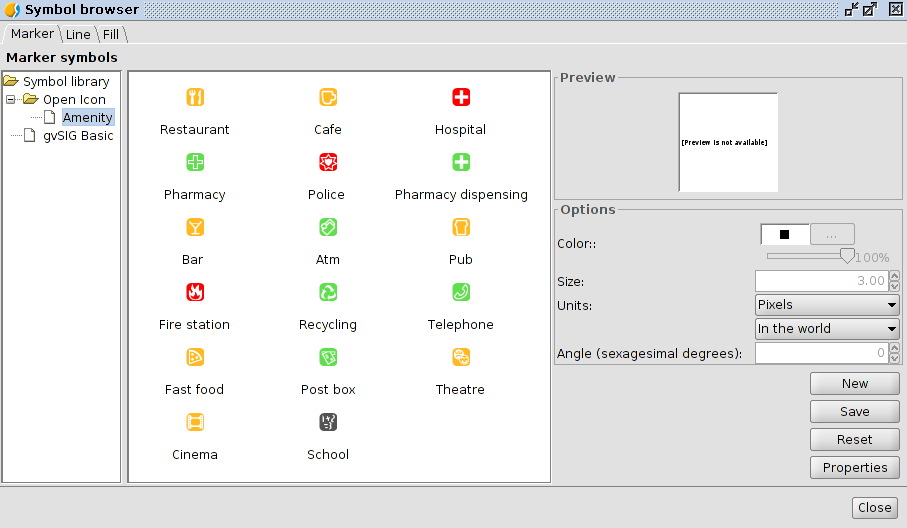
We can repeat the operation for every subfolder. We can see that “Open Icon” appears now beside “gvSIG Basic”. We only have to select “Open Icon” and it will appear in the “Folder name for creating the symbols” section, so we only have to add /Religion, /Shop…
The final aspect of the subfolder inside the symbol library would be similar to this image:

Finally an aspect to take into account. If we want to have a different symbol when we make a selection, we can do it automatically during the import. We only have to take into account the name of the images that will represent every symbol during the selection; we have to add “_sel” to the symbol name.

An easy way to create selecting symbols, if we don’t have them, is to use Inkscape, that allows us, for example, to change the colour of every symbol to yellow like the selected objects.
In a same symbol library we can have point, line or fill symbols or only one of them.


Pingback: gvSIG 2.0: How to create symbol libraries (II) | gvSIG blog
Pingback: gvSIG 2.0: “Google” symbols library | gvSIG blog
Pingback: gvSIG 2.0: Symbols library “OSM” | gvSIG blog
Pingback: gvSIG 2.0: Create symbols libraries (III) | gvSIG blog
Pingback: gvSIG 2.0: “Emergency” symbols library | gvSIG blog
Pingback: gvSIG 2.0: Forestry symbol library | gvSIG blog
Pingback: gvSIG 2.0: the improvements we never talk about | gvSIG blog
Pingback: gvSIG 2.0: Japanese Symbol library | gvSIG blog
Pingback: gvSIG 2.0: Creating symbols libraries (IV) | gvSIG blog
Pingback: gvSIG 2.0: some tricks with folders | gvSIG blog
Pingback: gvSIG 2.0: 日本のシンボルライブラリ | jgalans