In the former post we saw how to create a new symbol library from image files. Once the library is created it may be interesting to share it with other users and even with the community in general.
With gvSIG 2.0 we can easily do it as we can generate a package containing the library and install it in any other gvSIG from the add-ons manager.
It looks easy, isn’t it? It’s just what it is!
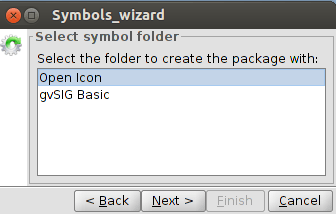
From the symbol library created in the former post, we are going to generate our package. For that, we have to select the option “Create package” within the menu Tools/Symbols. Then it will appear a window like this: In this window we can see all the symbol librearies available in our gvSIG, in this case “gvSIG Basic”, which is the default library, and “Open Icon”, which is the one we have created. Once selected the latter we will click on Next.
Then we get a dialog box with a form where we will fill in the “metadata” of our package. In this case the data could be similar to this:
The option “Is official” should not be checked when the package is generated by the community.
We will get a dialog box with four options to be defined:
– Package file (Archivo del paquete). It is the folder where the generated package will be saved in. By default, packages are saved in the gvSIG install folder, inside a folder called “install” (usually in “/home/usuario/gvSIG-desktop/gvSIG-desktop-2.0.0/install”. We will keep it without changes so we know where to find the package afterwords.
In case we want to share the package with the community through the Internet it is worth it to pay attencion in the following steps. Otherwise you can left the default options and go directly to “We already have our package containing the symbol library ready to share…”.
– Creating the package index. We will only check this option if we want to share the package. The package index is a GVSPKI file which is useful to install it on-line from gvSIG. No need to check it in any other case.
– Download URL. This is the most important step if we want our package to be available through the Internet.
In our case, assuming that we want to use the official gvSIG downloads server: http://downloads.gvsig.org/download/gvsig-desktop/pool/base-symbols/
And now we have to add the name of the package (we can copy it from the text box “Archivo de paquete”). For example, in our case in package file we have “/home/alvaro/gvSIG-desktop/gvSIG-desktop-2.0.0/install/gvSIG-desktop-2.0.0-Open Icon Library-1.0.0-0-final-all-all-j1_5.gvspkg” so the Download URL would be: “http://downloads.gvsig.org/download/gvsig-desktop/pool/base-symbols/gvSIG-desktop-2.0.0-Open Icon Library-1.0.0-0-final-all-all-j1_5.gvspkg”
– Package index file. Similar than “Package file”.
We already have our package containing the symbol library ready to share.
We can make the following test to check that we followed the steps correctly (with gvSIG closed).
– Go to your user folder and browse to “gvSIG/plugins/org.gvsig.app/Symbols”. Delete the folder “Open Icon”.
– Open gvSIG and check that the deleted symbol library doesn’t exist.
– Go to the add-ons manager (menu Tools/Add-ons) and select the option “Installation from file (install add-ons contained in a .gvspki or .gvspks file)”. Browse to the folder where our GVSPKS file is (in my case: “/home/alvaro/gvSIG-desktop/gvSIG-desktop-2.0.0/install/gvSIG-desktop-2.0.0-Open Icon Library-1.0.0-0-final-all-all-j1_5.gvspkg “) and select it.
– Press Next. In the list of available addons it should be one called “Open Icon” which is the one we generated. Check also that the description is ok. Install it and despite we get a message saying that we have to restart gvSIG, it is not necessary in this case so we could check that the new symbol library is already available.
In following posts we will share some symbol libraries that we are now creating in order that the community can use them and give more information about creating symbols (for example from a TTF font).
And, of course, we encourage you to create your own symbol libraries and share them with all the community.


Pingback: gvSIG 2.0: Add-ons manager | gvSIG blog
Pingback: gvSIG 2.0: “Google” symbols library | gvSIG blog
Pingback: gvSIG 2.0: “Emergency” symbols library | gvSIG blog
Pingback: gvSIG 2.0: Forestry symbol library | gvSIG blog
Pingback: gvSIG 2.0: Japanese Symbol library | gvSIG blog
Pingback: gvSIG 2.0: 日本のシンボルライブラリ | jgalans
My name is Elisha. I live in Shannon, Australia.I randomly
stumble on gvsig.org. I just want to say that I
liked your blog post about “gvSIG 2.0: How to create symbol libraries (II) “.