
As a complement of a previous post in which we talked about the table edition tools, today we will show you the tools for graphic edition. These tools will allow you to create and edit vector data. We must keep in mind that certain data formats are read-only and do not allow editing.
In order to add or modify elements of a layer, it must be necessary that the layer is activated and in editing mode. Depending on the type of layer to be edited (points, lines and / or polygons ), some tools will be available.
These tools are available from the “Layer” menu in the “Remove”, “Insert” and “Modify” submenus, from the “Edit” menu and from the corresponding button bars.
We remind you that this is a basic introduction course to GIS. Anyhow, in order to know in detail all editing tools we strongly recommend you to check out the gvSIG Desktop user manual:
- Graphic editing tools.
- Element-editing tools.
- Element-adding tools.
- Drawing support tools.From this section it is especially interesting the “snapping” tool that allows to create entities that are connected to each other.
- Edition tools.
After this introduction, we are going to do a practical exercise using information from the famous TV series Game of Thrones.
This exercise consists of creating a new layer in which we will add the routes or trips that follow each of the protagonists of the saga. In this case, we will draw Greyjoy brothers´ travel from Pyke to Meereen, passing through Volantis.
First of all, we have to create a new layer (in shapefile format). This tool is available in the menu, where we select the order “Layer/New Layer”.
An assistant will pop up. It will show the steps needed for creating a new layer :

We must select “Create a new Shape layer” and then, click the“Next” button.

In the next step, we will create an “Output File”; we have to indicate the name and the path route where the new layer will be saved (for example we can call it “Routes”). Once defined, we click the “Next” button.
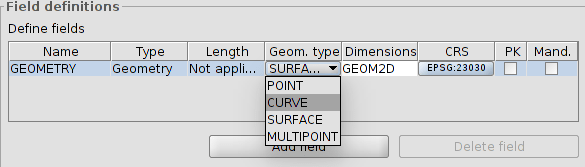
It is possible to define the geometry type of layer: Point, Curve, Surface or Multipoint. As we want to represent a route, we have to draw a layer consisting of lines. Therefore we select in the interface the “Curve” type of geometry.
It is possible to add attribute fields to the new layer using the “Add Field” button. We want to add a “Name” attribute, therefore we select “String” type (text string). It will serve us to identify by name each of the routes.

In this step we can add any kind of field needed to improve the classification. When the attribute table is defined, then click “Next”.

Finally we select the option “add the new layer to the view”. In order to end, press the “Finish” button. We have already the new, empty layer, with no elements included in. In order to continue the exercise we have to start filling with content.
To make easier the drawing of the route, (check out our previous post about in this page) “Labelling”,we will label the “Locations” layer, which will allow us to identify easily the route through the places we want to: Pyke, Volantis And Meereen. You can also use the “selection tools” or the “locator by attribute” to identify these locations.
First of all we are going to turn our layer in “edit mode”. When activated, there are two possible ways to do it: by selecting “Menu/layer/Start editing” o by clicking in the context menu of the Table of contents (TOC).

When in editing mode, the name of the layer turns red:
You will also see the new toolbars that have appeared in the interface. These will allow you to draw new elements as well as edit existing ones:![]()
The last change of interface is located at the bottom of the View, where we can expand or contract a command bar:
Before starting the drawing of the route it is interesting to keep in mind two basic supporting tools to drawing. We can change the display scale by using the mouse wheel, moving forward and back. When we press the wheel, we can scroll through the map.
To start drawing the route, select the “Draw polyline” tool::
We are located near Pyke and we click with the mouse, in order to have the first point of our route. Then we will use the mouse wheel to navigate through the map eand then add intermediate points until arriving first in Volantis, and later in Meereen. Once the last point is drawn, we click in the right mouse button and in the context menu we select the option “Finish”.
As previously shown at the “Editing Tables” post, now we could edit its attributes and write, e.g., “Greyjoy brothers” in order to identify this travel.
We could add new routes, each of which would be a new element of the layer. We are going to stop here, so we go to the menu and select “Layer / Finish Edition”.
The resulting route should be similar to one drawn in the following image:
Now you are ready to practice and get to know the rest of the editing tools! you can also practice the tools we have seen previously, e.g. by adding as hyperlink to an image identifying each route. 
We are just about to finish this course! See you in the next post, in which we will dive into geoprocessing tools.


Pingback: Learning GIS with Game of Thrones (XIV): Layouts | gvSIG blog