
Selecting tools are very important in all the GIS because, among other things, there are a lot of tools that are executed on selected elements. Besides they can be useful to locate elements with specified characteristics easily.
Before starting we remember that, as we saw in the post about Tables, where we select elements of a layer they are selected on its attribute table too (and vice versa).
Selecting tools can be found at the “Selection” menu or in the corresponding button:

Most of the selecting tools are graphical and their working is similar (and very easy). We are going to explain this working and we encourage you to test the different graphical selection tools.
To apply most of the graphical selection tools we have to press the main button of the mouse on the origin point of the selection, then drag and drop to finish selecting. In the selection by polygon case, for example, we have to click on each vertex of it and double click to finish it. And in simple selection option, we only have to click on the element to be selected.
To add entities to an existing selection, we have to keep “Control” key pressed while we select the elements. If we want to add or remove an element of a group of selected geometries, we have to press “Control” key and click on them. The selected elements are shown in yellow colour.
Have you tested it already?
Well, we’re going to see the non graphical selection tools in detail. Before starting open your “Game of Thrones”project…
Selection by attributes
This tool is in the “Selection/Select by attributes” menu or from the corrresponding button:
It allows to select elements through an enquiry of attributes.
The interface is this one:
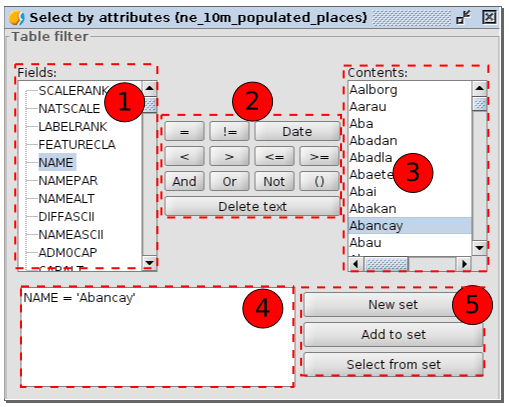
- Fields. List of attribute fields of the layer. When double clicking on a field it’s added to the enquiry of the selection.
- Logical operators. It allows to add a logical expression to the enquiry pressing on them.
- Known values. It shows a list with the different values of the selected field. When double clicking on it, it’s added to the enquiry.
- Enquiry. Space where the enquiry is being represented. It allows to be written directly.
- Selection options.
- New set. It creates a new selection.
- Add to set. The results of the new enquiry is added to the existing selection.
- Select from set. It creates a selection from the existing one. The enquiry is done on the elements selected previously and not on the whole layer.
Now we are going to apply “Select by attribute” tool to select all the castles of our geography. For that we are going to put “Locations” layer active (clicking on its name the name will change to bold). We run “Select by attribute” tool and make this enquiry: “type” = ‘Castle’

When we press “New set” all the castles of the layer will be selected. Now we can consult the attribute table of the layer to check it (as we saw at the “Tables” post) or navigate on the Wiew to see the castles location (as we saw at the “Navigation tools” post).
Select by layer
This tool is available from the “Selection/Select by layer” menu and from its corresponding button:

It allows to select elements from a layer according to its spatial relationship with elements from another layer.
The interface is this one:
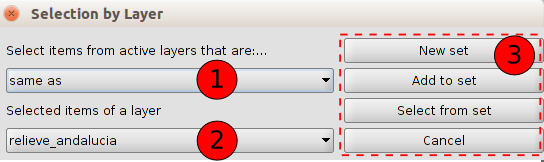
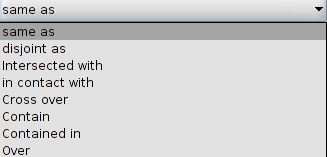
- Select items from active layer that are… Pull-down menu that allows us to indicate the selection method.
- Selected items of a layer. It allows us to select the layer for the spatial relationship through a pull-down menu. The elements that we want to take into account have to be selected at that layer. If we want a relationship of the whole layer we would have to select all the elements of that layer.
- Selection options. Similar to the “Select by attribute” ones.
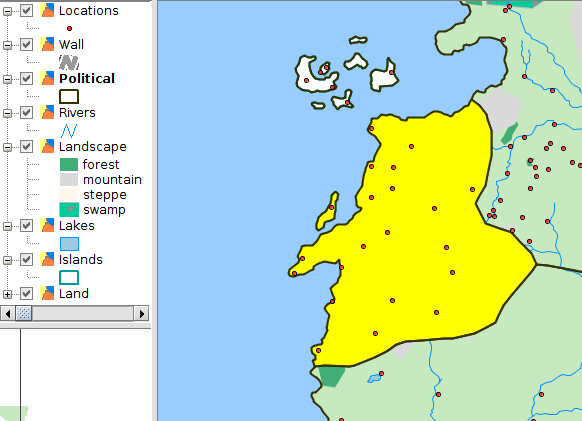
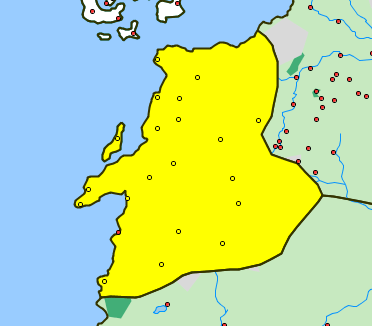
Now we are going to do an exercise where we will select all the elements of the “Locations” layer that are located in “The Westerlands”. For that we are going to activate “Political” layer, that includes the different kingdoms of Game of Thrones, and using “Select by attribute” tool we are going to do this query: name = ‘The Westerlands’
We also would be able to select the polygon graphically, but at this way we review the tool that we have just known. Results will be:
 We have the element selected in our reference layer already. Now we activate the “Locations” layer and we press “Select by layer” tool. In the new window we indicate these options:
We press “New set” and we will get all the locations contained in “The Westerlands”:
See you in the next post…


I have learnt so much, thanks to you.
Pingback: Learning GIS with Game of Thrones (VIII): Field calculator | gvSIG blog
Pingback: Learning GIS with Game of Thrones (XII). Graphic editing tools | gvSIG blog
Pingback: Learning GIS with Game of Thrones (XIII): Geoprocessing | gvSIG blog