Names of icons, menus and actions in gvSIG 2.0 (III): standardizations of naming

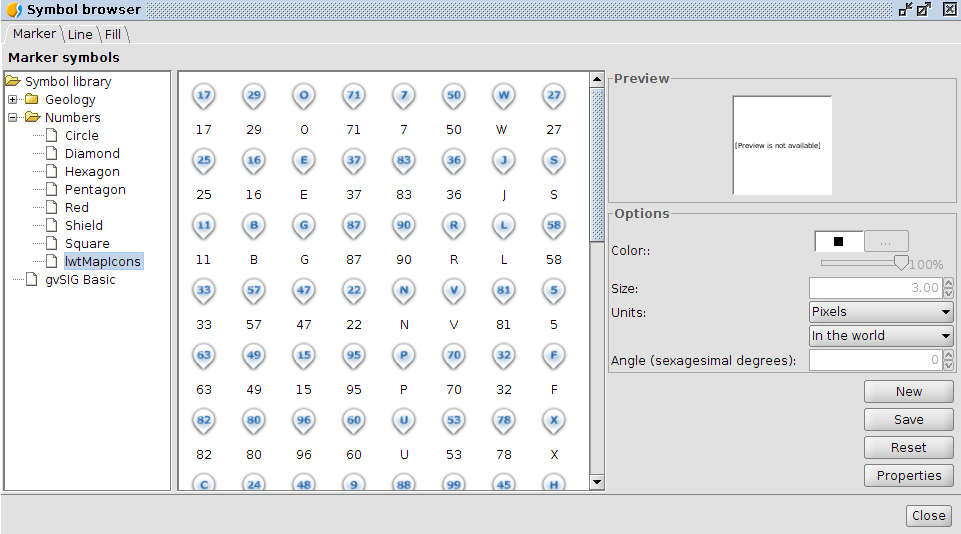
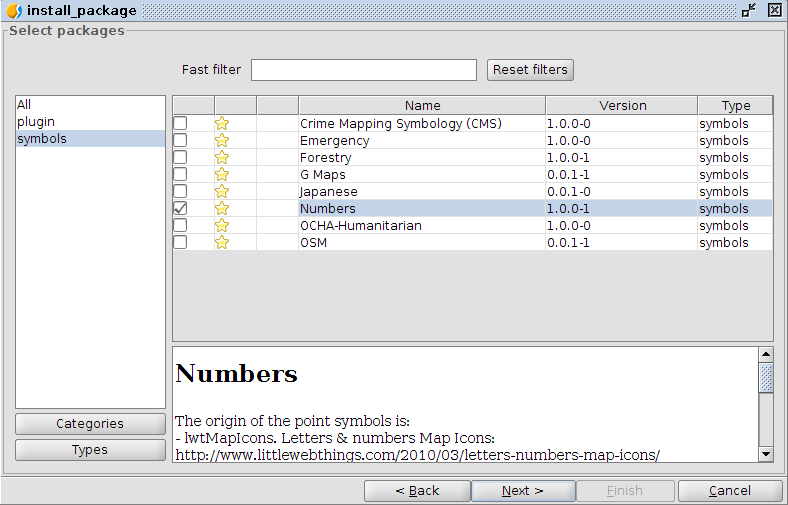
In the previous article, “Names of icons, menus and actions in gvSIG 2.0 II: aplying in gvSIG.“, we saw how to define an action and how to use it in menus and buttons in the application. We named the action, the icon, elected an “action-command” and positioned it. Now well, when electing  this things it’s not in a random way, we follow some rules we have to when doing it. First is that every action have got to be in an entry in main menus in gvSIG. It should not have an action in a button or contextual menu not represented in menus. In our example, we situated the action in menu entry:

  • Tools
    • Symbology
      • Import point symbols

The general rule to name an action is the complete route in menus, in English, separating menus entries by ““, replacing spaces by “” and eliminating others pointing symbols that could exist. Also the name of action would be “tools-symbology-import-point-symbols“. It could happen the action name would conflict with other action, for example, menu entry:

  • Selection
    • Select all

It would  be used to select all lines of a table, or all elements in map or geometries  in active layer in the view. We’d have  three distinct actions, and what we would do would be add a suffix in the name’s end of the action indicating about what object is applied the action. So we’d have:

  • selection-select-all-table
  • selection-select-all-layout
  • selection-select-all-layer

Following these little considerations we’ll name our action, and so we have the name, we’ll name the remaining actions elements.

Now we elect  the name used to the “action-command“. As general rule, we’’ll use same name of the action.

The  next we’ll have to select would be the name of icon. We’ll follow three simple rules:

  • If action is contemplated in actions recognized within Tango Desktop Project, of freedesktop.org will be used icon name proposed by it.
  • If a suffix had not been added to the action, the name of the action will be used.
  • If a suffix had been added to the action, the name of the action will be used, eliminating the suffix.

Finally, we have to assign a position to our action. In version 2 of gvSIG is stablished the following convention to stablish the positions of action:

AAABBBCCCD

Where:

  • AAA, represents first level menu inside gvSIG menu. There are stablished the following values:
    • 10 to menu File
    • 20 to menu Edit
    • 30 to menu Select
    • 40 to menu Show
    • 50 to menu Table
    • 60 to menu Layer
    • 65 to menu View
    • 70 to menu Map
    • 90 to menu Tools
    • 96 to menu Window
    • 99 to menu Help
  • BBB, three digits filled of zeros in left represented by position  inside menu AAA. In case of not proceeding, we could indicate “000″.
  • CCC, in case entry in BBB is a submenu, this indicates position inside this submenu. It also is filled of zeros in left, and in case it doesn’t proceed we indicate “000″.
  • D, in case entry in CCC be a submenu, this indicates position inside this submenu, in case it don’t proceed we indicate “0″.

With these values we could compose the position’s value, that will be used to situate an action related to others always when showed to user.

In case of the example the position indicated is “900400200″:

  • 90, menu “Tools
    • 040, submenu “Symbology
      • 020, position inside menu symbology of entry “Import point symbols
        • 0, don’t proceeding this way leaving a zero.

In gvSIG are included several tools that allow us to see a list of actions or menu entries installed in a moment. We could follow menu:

  • Tools
    • Devel
      • Show menu information

To get a list of menu entries, where we could see its position to get an idea where we have to put ours and what position‘s number we have to assign it.

In the same menu Development, we have an option “Show action information” that will show us a list of all registered actions in the app ordered by plugin that supports it.

It’s possible to get a list of action and menu entries of the app following menu “Tools->development->Show actions information”

Posted in opinion | Leave a comment

Encuentro Curso IFD San Ramón

Nuevamente compartimos la noticia de un curso realizado recientemente, esta vez en el Instituto de Formación Docente “Juan Pedro Tapié” de San Ramón, Canelones (Uruguay) y organizado por el propio IFD San Ramón y apoyado por SNAP (DINAMA-MVOTMA) y la Dirección Nacional de Topografía (MTOP).

Image

Fue en modalidad e-learning a través de la plataforma Edmodo, con una duración de dos meses y evaluación final, y moderado por tres turores: Prof. Gabriel Calixto y Prof. Genoveva Laurente, con apoyo de Mtra. Bettina Delgado. El frío no fue impedimento para el éxito del mismo. ¡Felicitaciones!

Image

Posted in opinion | 2 Comments

gvSIG 2.0: Improved Map Sheets plugin now available

The Map Sheets plugin for gvSIG 2.0 has just been released (read official announcement here). This plugin allows the user to create and print map series covering a certain area of interest. Each resulting sheet will have its particular values for certain fields. This new version of the plugin also allows each sheet frame to be rotated, which means that the top margin will not necessarily be the North:

User can rotate sheet frame by holding down the SHIFT key and dragging the mouse. Click to see full image.
Description of some components of one of the resulting maps. Click to see full image.

This video illustrates the plugin usage as it goes through its essential functionalities:

Short (59 seconds) Full (5 minutes)
Posted in development, english, gvSIG Association, gvSIG Desktop | Tagged , , , , , , | Leave a comment

Extensión Map Sheets mejorada para gvSIG 2.0

Se acaba de publicar el complemento Map Sheets para gvSIG 2.0 (ver anuncio oficial aquí). Este complemento permite crear automáticamente series de mapas que cubran un cierto área de interés, permitiendo la variación de los valores de los campos para cada hoja. Además, se trata de una versión mejorada del complemento, ya que permite la rotación durante el ajuste de la zona de cada hoja, de modo que en ese mapa en concreto (que se generará automáticamente con el resto) el Norte no será necesariamente el margen superior de la hoja, aunque el mapa en sí seguirá teniendo forma rectangular:

El marco de cada hoja puede rotarse arrastrando y manteniendo pulsada la tecla SHIFT (mayúsculas). Pinche para ver imagen completa.
El marco de cada hoja puede rotarse arrastrando y manteniendo pulsada la tecla SHIFT (mayúsculas).
Descripción de algunos elementos del mapa final. Pinche para ver imagen completa.
Descripción de algunos elementos del mapa final.

En el siguiente vídeo puede verse una demostración completa del uso de este complemento repasando sus funcionalidades principales:

Versión corta (59 segundos) Versión completa (5 minutos)
Posted in development, gvSIG Desktop, spanish | Tagged , , , | 12 Comments

gvSIG 2.0: Symbols Library “Numbers”

In more than a time we find ourselves with a need of a library with numerical symbols to identify specific elements in our layouts created with gvSIG.

To solve it we generated  a new symbols library, which we call “numbers” and that contains, basically, numerical symbols.

0_numbers2To create the markers symbols we started from different sources on public domain.

  • The symbols of  “Letters & Numbers” published by Little Web Things      that contains beyond symbols from number 0 to 99, letters symbols in      upper-case of Latin alphabet.
  • The fonts of text from Data Deja View (DDV) called “Circle, Diamond, Hexagon, Pentagon, Shield and Square”, that with Inkscape we transformed to svg files imported with gvSIG.
  • The numbers icons belonging to the set called Red Orb Alphabet Icons of Icon Archive.

Combining this markers we completed the library with symbols of lines and filling.

Of course, when using point symbols of set “IwtMapIcons” consider that by default it don’t have applied a offset in “y”, if wanted the vignette appears over geometric point we have to edit the symbol properties and add an offset in “y” of a half the size ( in our case, as we set these symbols in size 32, we’ll use a offset of 16).

Commenting too  that one of the improvements planned to new versions consist in the symbols appears to us sorted alphabetically, what with no doubt will facilitate identifying them and, in cases like this library, will turn the time to search one of them smaller.

The installation way is the usual, from add-ons manager (selecting URL http://downloads.gvsig.org/download/gvsig-desktop/ and searching for “Types/Symbols”) or directly downloading the package here.

0_numbers1

Posted in english, gvSIG Desktop | Leave a comment

Names of icons, menus and actions on gvSIG 2.0 (II): Applying it on gvSIG

Some days ago we started a little series of articles related to the names of the icons, menus and actions with the article: Names of icons, menus and actions on gvSIG 2.0 (I). We’re going to continue telling some other things that can be interesting for the developers.

When we create a plugin for gvSIG, it’s usually that we want to add some option to the menus, or some button to the button bar of the application. To do this we have to indicate it in the config.xml file, the same that we did it in the previous versions of gvSIG. Nevertheless a new concept has been introduced in the 2.x version. This is the action.

An action, as its name indicates, identify an action that the user can make on gvSIG, without being joined to a menu or a button of the toolbar. The actions can be run or linked from any part of gvSIG, we only have to know its name. The action has a series of associated data:

  • A name that identifies it in an only way in all the actions registered in the application.
  • A label, that can be used to present this, for example in a button or in a contextual menu.
  • A tip, with a short description about the tasks made by the action, to present it in buttons or menus.
  • An icon that represents it, to be used for example in buttons.
  • A keyboard accelerator associated to the action for the case that it’s needed to.
  • An absolute position regarding to the other actions.
  • A code associated to this, to calculate when the action must be visible or enable or what is the code associated to the action running.

Having this centralized information associated to an action allows us to have them in a homogeneous way, and it’s not important where they do it from. They always can have the same label, or the same icon, or the same accelerator, or the same position regarding to other actions.

At this way, if we want to present the same action in a menu and a button at the buttons bar we only will have to associate the action to the menu or the bar, and add the rest of the options that they need and that aren’t defined at the action.

The class that represents the action can’t be overwritten by code. It’s a class offered by andami as an own service, and the developer can use it but not overload it… then… How is the associated code provided for an action?

To contribute with the code associated to an action it’s used the extensions mechanism that gvSIG included in the previous versions. An action has:

  • A plugin that contains it.
  • A Iextension that provides its logic.
  • An action-command, to identify the action of the extension.

How to configure the actions and menus

To configure the actions, menus and tool buttons in gvSIG, the config.xml file is used. This file has the general configuration of our plugin: its extensions, the actions, menus, toolbars and buttons.

We are going to suppose that we have an extension that allows us to import images from a folder, like gvSIG point symbols, and we want to add to the Tools menu, Symbology submenu, an entrance Import point symbols. The first step would be to define our action. We are going to see how to do it. Our action would have the following attributes:

  • name, that will have the name of the action. In our case we will call it “tools-symbology-import-point-symbols“.
  • label, that will have a label that represents the action. This label will be translated to the language that gvSIG is being run, and must be registered at the translations database of the application. In our case we will add “_import_point_symbols“.
  • tooltip, with a short description to be used as a tip where it’s needed, we will select “_import_images_from_folder_as_point_symbols“. This string will also be translated before being used.
  • icon, here we will write the name of the icon to be used from the icons theme that is loaded in gvSIG. Our extension will usually register an icon by default in the icons theme with the name that we indicate here. We will write “tools-symbology-import-point-symbols
  • position, we will indicate the absolute position respecting the other actions. We will write “900400200“.
  • accelerator, where we would indicate what keyboard accelerator we want to associate to this action. The format to specify the keyboard accelerator would be:

       modifier + key

without spaces, where modifier would be able to be one or several of the following ones, separated by the “+” character:

      • CTRL
      • SHIFT
      • META
      • ALT

And the keys would be:

      • Letters from A to Z
      • Numbers from 0 to 9
      • Strings from F1 to F12
      • The DELETE string.

For our example we won’t indicate any accelerating key, and for that we only would leave the value as “” or simply not specifying the attribute.

  • action-command, that will be the value sent to our extension when the execute method is invoked. In our case we will write the same that we selected for our action, “tools-symbology-import-point-symbols

All these aspects would be finally:

<action 
   name="tools-symbology-import-point-symbols" 
   label="_import_point_symbols"
   tooltip="_import_images_from_folder_as_point_symbols" 
   action-command="tools-symbology-import-point-symbols"
   icon="tools-symbology-import-point-symbols" 
   position="900400200" 
   accelerator="" 
/>

Once our action is defined, we would be able to use it to be associated to menus or buttons. In our case we had thought to associate it to a menu. To do this, we would have to select the same the menu the same as the action, and then we only would have to fill in the “text“ attribute. It would be something like this:

<menu
     name="tools-symbology-import-point-symbols" 
     text="tools/Symbology/Import_point_symbols"
/>

If we also want to add It to the buttons we would be able to create a toolbar and add the button to it. To add the button to the toolbar we would be able to do it at this way:

<tool-bar name="symbology" position="10">
  <action-tool name="tools-symbology-import-point-symbols" />
</tool-bar>

With that we would create the toolbar “symbology” if it doesn’t exist, and a button with the data of our action would be added. For that we only have to name the button the same as the action that we had defined.
The three labels that we have seen must be in the label that defines our extension, “extensión“. We are going to see how our “config.xml“ would be able to be written:

<?xml version="1.0" encoding="ISO-8859-1"?>
<plugin-config>
  <libraries library-dir="lib" />
  <depends plugin-name="org.gvsig.app" />
  <resourceBundle name="text" />
  <extensions>
    <extension
      class-name="org.gvsig.symbology.app.importsymbols.ImportSymbolsExtension"
      description="Import images from a folder as point symbols" 
      active="true">

      <action 
         name="tools-symbology-import-point-symbols" 
         label="_import_point_symbols"
         tooltip="_import_images_from_folder_as_point_symbols" 
         action-command="tools-symbology-import-point-symbols"
         icon="tools-symbology-import-point-symbols" 
         position="900400200" 
         accelerator="" 
      />
      <menu
           name="tools-symbology-import-point-symbols" 
           text="tools/Symbology/Import_point_symbols"
            />
    </extension>
  </extensions>
</plugin-config>
Posted in opinion | 1 Comment

gvSIG 2.0: Biblioteca de símbolos “Numbers”

En más de una ocasión nos encontramos con la necesidad de una biblioteca con símbolos numéricos para identificar determinados elementos en nuestros mapas realizados con gvSIG.

Para resolverla hemos generado una nueva biblioteca de símbolos, a la que en un alarde de originalidad hemos llamado “Numbers” y que contiene, básicamente, símbolos numéricos. 0_numbers2

Para realizar los símbolos de marcadores hemos partido de distintas fuentes de dominio público.

  • Los símbolos de “Letters & Numbers” publicados por Little Web Things que contiene además de símbolos de los números del 0 al 99, símbolos letras en mayúsculas del alfabeto latino.
  • Las fuentes de texto de Data Deja View (DDV) denominadas “Circle, Diamond, Hexagon, Pentagon, Shield y Square”, que mediante Inkscape hemos transformado a ficheros svg importados con gvSIG.
  • Los iconos de números pertenecientes al conjunto denominado Red Orb Alphabet Icons de Icon Archive.

Combinando estos marcadores hemos completado la biblioteca con símbolos de líneas y de relleno.

Por cierto, cuando uséis los símbolos puntuales del subconjunto “lwtMapIcons” tened en cuenta que por defecto no tienen aplicado un offset en “y”, por lo que si queréis que la viñeta aparezca encima del punto geométrico debemos editar las propiedades del símbolo y añadir un offset en “y” de la mitad del tamaño del símbolo (en nuestro caso, como a estos símbolos les hemos dado por defecto el tamaño de 32, utilizaremos un offset de 16).

También comentar que una de las mejoras planificadas para próximas versiones consiste en que los símbolos nos aparezcan ordenados alfabéticamente, lo que sin duda facilitará la identificación de los mismos y que, en casos como el de esta biblioteca, agilizarán la búsqueda de uno de ellos.

La forma de instalación es la habitual, a través del administrador de complementos (seleccionando la URL http://downloads.gvsig.org/download/gvsig-desktop/ y buscando por “Tipos/symbols”) o directamente descargándoos el paquete desde aquí. 0_numbers1

Posted in gvSIG Desktop, spanish | Tagged , | Leave a comment

gvSIG 2.0: some tricks with folders

wizard_penguin In the last posts dedicated to the news of gvSIG 2.0 we have seen how we can create new symbols libraries or thematic maps. In both cases gvSIG stores information in folders.

Let’s see some tricks to the most restless users (and careful).

Deleting a symbols library

Symbols are stored by default in user folder /gvSIG/plugins/org.gvsig.app/Symbols.

Searching this folder we’ll see a subfolder for each symbols library installed in gvSIG. By default it only shows “gvSIG basic” that’s the symbols library that comes with basic installation of gvSIG 2. If you have installed other libraries as Google, OSM, OCHA, … you’ll find a subfolder for each one.

If you want to delete one of them and it is not shown in your gvSIG, it is so easy as delete the subfolder.

This could be very useful when creating our own symbols libraries and we want to test if we can delete it easily.

Joining two symbols libraries

Imagine you want to join two symbols libraries in one or, for example, add a part of the symbols of a library in other. Well, is so easy as copy the content of one in the other. When opening again gvSIG, it will read the new organization of folders/symbols and will show it in the symbology manager.

Deleting a thematic map

In gvSIG 2.0 thematic maps are stored by default inside user folder gvSIG/plugins/org.gvsig.educa.thematicmap.app.viewer/thematicMaps.

Here we find a list of all thematic maps we have been creating and  are available in gvSIG. We’ll find a subfolder for each thematic map created. This subfolder will content two files, a .info and a .gvsthm. To delete a thematic map just delete the corresponding subfolder.

Posted in english, gvSIG Desktop, opinion | 6 Comments

gvSIG 2.0: algunos trucos con carpetas

wizard_penguinDurante los últimos post dedicados a las novedades de gvSIG 2.0 hemos visto como podemos crear nuevas bibliotecas de símbolos o mapas temáticos. En ambos casos gvSIG almacena la información en carpetas.

Vamos a indicar algún pequeño truco para los usuarios más inquietos (y cuidadosos).

Borrar una biblioteca de símbolos.

Los símbolos se guardan por defecto dentro de la carpeta del usuario en /gvSIG/plugins/org.gvsig.app/Symbols.

Si consultamos que contiene esta carpeta veremos que hay una subcarpeta por cada biblioteca de símbolos que tengamos instalada en nuestro gvSIG. Por defecto sólo aparecerá “gvSIG basic” que es la biblioteca de símbolos que viene por defecto en la instalación básica de gvSIG 2. Si habéis instalado otras bibliotecas como la de Google, OSM, OCHA,… encontraréis una subcarpeta por cada una de ellas.

Si queréis borrar una de ellas y que no os aparezca en vuestro gvSIG, es tan fácil como eliminar dicha subcarpeta.

Esto puede ser bastante útil cuando estamos creando nuestras propias bibliotecas de símbolos y queremos realizar pruebas que podamos borrar con facilidad.

Combinar dos bibliotecas de símbolos

Imagina que quieres unificar dos bibliotecas de símbolos en una o, por ejemplo, añadir parte de los símbolos de una biblioteca a otra biblioteca. Bien, es tan simple como copiar el contenido de una dentro de la otra. Al abrir de nuevo nuestro gvSIG, leerá la nueva organización de carpetas/símbolos y la mostrará en el gestor de simbología.

Borrar un mapa temático

En gvSIG 2 los mapas temáticos se almacenan por defecto dentro de la carpeta del uuario en gvSIG/plugins/org.gvsig.educa.thematicmap.app.viewer/thematicMaps.

Aquí encontraremos un listado de todos los mapas temáticos que hemos ido creando y que tenemos disponibles desde gvSIG. Encontraremos una subcarpeta por cada mapa temático creado. Esta subcarpeta contendrá dos ficheros, un .info y .gvsthm. Para eliminar un mapa temático basta con borrar la subcarpeta correspondiente

Posted in gvSIG Desktop, spanish | Tagged , | 1 Comment

gvSIG 2.0: Creating symbols libraries (IV)

With this post we are finishing the series initiated to show the new possibilities that gvSIG 2.0 has to create our own symbols libraries. We hope it has been useful, as seen following simple steps and getting help in other free applications like Inkscape or Gimp, is very simple massively incorporate symbols of every type to gvSIG and, besides, share with other users.

Up to now we have seen how to generate a symbols library starting both on image files (svg, png…) like on a source. Now we are presenting a new case: we have a PDF with symbols we’d like to incorporate in gvSIG: can we do it?

We’ll show a way to do it in a practical example. For this we will use as origin of our symbols the public PDF of FGDC (Federal Geographic Data Committee) named “Digital Cartographic Standard for Geologic Map Symbolization”. Let’s imagine that what’s interesting for us is the fossils symbols recompiled in page 109.

Fos_01First step is open the PDF in Inkscape. It will ask what page we want to open and we’ll indicate 109. Once opened, each symbol is an individual element, that we can select, copy and paste in other file we’ll save in SVG. Easy, isn’t it?

Repeating it to each symbol we have our set of images listed to import to gvSIG.

Fossils_gvSIGThese symbols will serve as basis to a new library of symbols we’re preparing and we’ll share with other users soon.

Posted in english, gvSIG Desktop | Leave a comment