gvSIG 2.0: Mirrors para descargas

Una de las características más importantes de la versión 2.0 de gvSIG Desktop es el Administrador de complementos, desde el cual se pueden instalar los distintos paquetes (extensiones, complementos…, y más adelante los ficheros de traducción) directamente desde la aplicación. Esta versión ya está orientada totalmente a ello, no será necesario descargar las extensiones aparte, e instalarlas después sobre gvSIG. Por este motivo, se hace necesario tener varios servidores de descarga, varios mirrors para la descarga de los paquetes.

Hasta el momento, los servidores de descarga han sido facilitados por la Comunidad Rusa gis-lab.info, la Comunidad Rusa de gvSIG, LAPIG (Laboratório de Processamento de Imagens e Geoprocessamento, Universidade Federal de Goiás, Brasil), el Proyecto i3Geo (Edmar Moretti, Brasil), Geocuba (Cuba), ELOGeo (E-learning for Open Geospatial Community, University of Nottingham, Reino Unido), y Open Source Geospatial Foundation (OSGeo).

Esta nueva infraestructura permitirá descargar los paquetes de las distintas extensiones, complementos… desde gvSIG a través del administrador de complementos (menú Herramientas->Administrador de complementos). Para ello se han incluido las distintas URL de los servidores en un desplegable en la ventana inicial.

Mirrors1

Por otra parte permitirá descargar los binarios de la aplicación (la versión completa con prerrequisitos) desde la tabla de descargas de la web de gvSIG, teniendo la opción de elegir de qué servidor queremos descargarla.

Mirrors2

Desde el proyecto gvSIG queremos agradecer a todas las personas y entidades que han proporcionado estos servidores de descargas.

Posted in gvSIG Desktop, spanish | 6 Comments

gvSIG 2.0: How to create symbol libraries (II)

In the former post we saw how to create a new symbol library from image files. Once the library is created it may be interesting to share it with other users and even with the community in general.

With gvSIG 2.0 we can easily do it as we can generate a package containing the library and install it in any other gvSIG from the add-ons manager.

It looks easy, isn’t it? It’s just what it is!

From the symbol library created in the former post, we are going to generate our package. For that, we have to select the option “Create package” within the menu Tools/Symbols. Then it will appear a window like this:201_gvsig_symbolIn this window we can see all the symbol librearies available in our gvSIG, in this case “gvSIG Basic”, which is the default library, and “Open Icon”, which is the one we have created. Once selected the latter we will click on Next.

Then we get a dialog box with a form where we will fill in the “metadata” of our package. In this case the data could be similar to this:202_gvsig_symbol

The option “Is official” should not be checked when the package is generated by the community.203_en

We will get a dialog box with four options to be defined:

Package file (Archivo del paquete). It is the folder where the generated package will be saved in. By default, packages are saved in the gvSIG install folder, inside a folder called “install” (usually in “/home/usuario/gvSIG-desktop/gvSIG-desktop-2.0.0/install”. We will keep it without changes so we know where to find the package afterwords.

In case we want to share the package with the community through the Internet it is worth it to pay attencion in the following steps. Otherwise you can left the default options and go directly to “We already have our package containing the symbol library ready to share…”.

Creating the package index. We will only check this option if we want to share the package. The package index is a GVSPKI file which is useful to install it on-line from gvSIG. No need to check it in any other case.

Download URL. This is the most important step if we want our package to be available through the Internet.

In our case, assuming that we want to use the official gvSIG downloads server: http://downloads.gvsig.org/download/gvsig-desktop/pool/base-symbols/

And now we have to add the name of the package (we can copy it from the text box “Archivo de paquete”). For example, in our case in package file we have “/home/alvaro/gvSIG-desktop/gvSIG-desktop-2.0.0/install/gvSIG-desktop-2.0.0-Open Icon Library-1.0.0-0-final-all-all-j1_5.gvspkg” so the Download URL would be: “http://downloads.gvsig.org/download/gvsig-desktop/pool/base-symbols/gvSIG-desktop-2.0.0-Open Icon Library-1.0.0-0-final-all-all-j1_5.gvspkg

Package index file. Similar than “Package file”.

We already have our package containing the symbol library ready to share.

We can make the following test to check that we followed the steps correctly (with gvSIG closed).

– Go to your user folder and browse to “gvSIG/plugins/org.gvsig.app/Symbols”. Delete the folder “Open Icon”.

– Open gvSIG and check that the deleted symbol library doesn’t exist.

– Go to the add-ons manager (menu Tools/Add-ons) and select the option “Installation from file (install add-ons contained in a .gvspki or .gvspks file)”. Browse to the folder where our GVSPKS file is (in my case: “/home/alvaro/gvSIG-desktop/gvSIG-desktop-2.0.0/install/gvSIG-desktop-2.0.0-Open Icon Library-1.0.0-0-final-all-all-j1_5.gvspkg “) and select it.

– Press Next. In the list of available addons it should be one called “Open Icon” which is the one we generated. Check also that the description is ok. Install it and despite we get a message saying that we have to restart gvSIG, it is not necessary in this case so we could check that the new symbol library is already available.

In following posts we will share some symbol libraries that we are now creating in order that the community can use them and give more information about creating symbols (for example from a TTF font).

And, of course, we encourage you to create your own symbol libraries and share them with all the community.


Posted in english, gvSIG Desktop | Tagged | 7 Comments

gvSIG 2.0. Administrador de complementos

Quizá una de las novedades potencialmente más útiles de gvSIG 2.0 sea el administrador de complementos (aunque gvSIG 1.12 ya traía una primera versión), cuyas principales ventajas son:

  • Se pueden actualizar complementos sin esperar a la siguiente versión de gvSIG.
  • Se puede personalizar la instalación de gvSIG.
  • Se pueden compartir fácilmente complementos como símbolos, idiomas, scripts, etc.

Antes de explicar el funcionamiento de la herramienta conviene dejar claro los tipos de distribución de gvSIG disponibles ya que en función de la distribución a partir de la cual instalamos gvSIG, podremos seleccionar distintas opciones dentro del administrador de complementos:

  • Distribución estándar. Contiene los paquetes de la instalación por defecto más un conjunto reducido de complementos. Corresponde con la distribución “con prerrequisitos incluidos” de la tabla de descargas.
  • Distribución online. Contiene la instalación básica y mínima de gvSIG pero sin funcionalidad. Para finalizar la instalación de complementos es necesario disponer de conexión a internet. Corresponde con la distribución “sin prerrequisitos” de la tabla de descargas.

El administrador de complementos nos permite, por un lado, modificar la instalación por defecto añadiendo o quitando complementos con respecto a los inicialmente propuestos, y por otro instalar o actualizar complementos posteriormente. En el presente post vamos a explicar el funcionamiento de la herramienta suponiendo que gvSIG ya está instalado. No obstante la mayoría de la información es válida para la parte de la instalación en la que se ejecuta el administrador de complementos.

El administrador de complementos está disponible en el menú Herramientas/Administrador de complementos de gvSIG 2.0. Al ejecutarlo lo primero que nos aparece es un cuadro de diálogo en el que se nos muestran las siguientes tres opciones, tal y como podemos ver en la imagen:

  • Standard installation (install addons contained in the gvSIG standard distribution)
  • Installation from file (install addons contained in a .gvspki or .gvspks file)
  • Installation from URL (install addons from a remote repository)

Addons_manager_options

Veamos qué implica cada una de ellas:

Standard installation

Esta opción solo está disponible en caso de que gvSIG se haya instalado desde la distribución estándar y solo permite instalar complementos incluidos en ella, normalmente los complementos más populares y con un mayor nivel de estabilidad dentro de todos los disponibles. Por lo tanto es la opción más segura en el sentido de que no es probable que los complementos que se instalen contengan errores graves.

Otra cosa a tener en cuenta es que no se requiere conexión a internet en el momento de la instalación.

Installation from file

La principal ventaja de esta distribución es que te permite instalar complementos compartidos por otra persona sin que necesariamente tengan que estar en el repositorio oficial de paquetes de gvSIG. No obstante también es útil si se quiere instalar un complemento oficial de forma individual previamente descargado. En este enlace [1] pueden consultarse todos los complementos disponibles para la versión 2.0.

Installation from URL

Mediante esta opción podemos acceder a los complementos disponibles en distintos repositorios. El URL marcado por defecto corresponde al repositorio específico de la distribución instalada, el cual contiene los todos los complementos compatibles con esa distribución, incluyendo complementos en desarrollo.

El resto de URLs corresponden a mirrors del repositorio oficial genérico de la versión instalada (gvSIG 2.0 en este caso) a través del cual podremos acceder a los complementos compatibles con todas las distribuciones de una determinada versión.

Esta opción es la indicada si estamos interesados en probar complementos en desarrollo ya que nos muestra todos los disponibles independientemente de su estado de desarrollo. Por este motivo no es recomendable instalar complementos de forma masiva ya que alguno de ellos podría causar daños en la aplicación. Si los instalamos uno a uno es más fácil detectar y eliminar el complemento que da problemas.

Una vez seleccionada una de las tres opciones accederemos a la lista de complementos que contiene tanto los elementos instalados como los disponibles para instalar, lo cual variará según la opción que hayamos seleccionado.

Addons_list

Las tres primeras columnas de la lista nos informan respectivamente sobre:

  • Si el complemento está ya instalado (verde), o no (blanco). Los complementos instalados pueden volver a instalarse salvo si están marcados con un candado.
  • Si el complemento es oficial y recomendado.
  • El sistema operativo con el que es compatible en caso de que solo sea compatible con uno específico.

El resto de información es:

  • Nombre
  • Versión. Útil si hay más de una versión disponible de un mismo complemento.
  • Tipo. Actualmente solo existen dos tipos (plugin y symbols) pero en el futuro se añadirán otros como idiomas, iconos, etc.

Para facilitar la búsqueda se puede filtrar por categoría y tipo (parte izquierda de la ventana) y también se puede filtrar por texto (parte superior de la ventana).

Una vez seleccionados los complementos a instalar pasaremos a una ventana en la que podemos seguir el proceso de instalación. Finalmente se nos informa de que para aplicar los cambios es necesario reiniciar la aplicación.

Os dejamos unos vídeos en los que se muestra un ejemplo de cada tipo de instalación:

Posted in gvSIG Desktop, Products, spanish | Tagged , , | 16 Comments

Datos en NetCDF para gvSIG v2.0

NetCDF es un formato de datos orientado a almacenar datos científicos en forma de arrays multidimensionales. Es decir, una lista de variables que tienen un significado concreto (presión, temperatura, posición,…). Suele decirse que es un contenedor de datos de cualquier tipo y auto-descriptivo. Esto quiere decir que en su cabecera se describe su contenido.

Como contenedor genérico tiene las ventajas que puede almacenar datos tanto ráster como vectoriales y que estos pueden ser especificados para diferentes momentos en el tiempo. Esto es útil en el almacenamiento de datos en local que provienen de sensores en el que las capturas de información son periódicas y los datos capturados heterogéneos.

Se han desarrollado dos plugins para gvSIG v2.0 que ofrecen soporte para NetCDF. Su integración en gvSIG ha tenido que hacerse desde el punto de vista de la propia aplicación y separar dicho soporte en dos proveedores de datos distintos, uno ráster y otro vectorial, ya que su representación gráfica en gvSIG es totalmente diferente. Con la incorporación de este formato, gvSIG ya dispone de un formato con la capacidad de cargar y exportar datos con información temporal.

Pero la información temporal requiere de un tratamiento especial en cualquier Sistema de información geográfica que se precie, ya que el usuario debe ser capaz de filtrar la información que quiere ver en un instante preciso o un intervalo temporal. Además debe de ser posible procesar estos datos de forma que se tenga en cuenta el momento o incluso poder realizar animaciones a lo largo del tiempo. En este sentido gvSIG también ha sufrido un avance importante, ya que incorpora esta funcionalidad (filtrado de los datos por tiempo y realización de pequeñas animaciones). Hay que decir que todavía le falta alguna evolución a la hora de realizar geoprocesamiento sobre capas que contenga información temporal, además de integrar el soporte de tiempo en la parte ráster. Esperemos poder ir subsanando estas deficiencias en futuras versiones aunque de momento ya es posible disponer de estos plugins.

Posted in gvSIG Desktop, spanish | 2 Comments

gvSIG 2.0. Raster data tile cache and WMTS

Those gvSIG users that usually load WMS layers know very well that the response time, each time we pan or zoom on the view, is not insignificant. If, besides, we have more than one WMS layer loaded, the response time is even lower, which could require a big dose of patience. gvSIG 2.0 brings two new features that improve the user experience when accessing remote raster data.

The first of them is the WMTS (Web Map Tile Service) support. This service is a OGC standard which aim is just fix the mentioned performance problems of the WMS by using tiles. Tiles are portions of image that provides the server and that are stored in our hard disk, being locally accessible from that time on so the software don’t have to connect to the server anymore to load that data, improving the response speed. In the following video we can see gvSIG accessing a WMTS.

Despite a increase of the number of WMTS servers available is expected, nowadays there are far fewer WMTS servers than WMS ones, which makes even more interesting the second of the new features this post talks about: the raster data tile cache.

Raster data tile cache consists on applying the WMTS principle, this is, managing tiles locally, to all raster data sources in general. This is particularly interesting in the case of WMS as it reduces the data traffic through the network and, thus, the response time. In the following video we can see the difference between accessing a WMS with the tile cache option activated and not activated.

The difference between the tile managing in the case of WMTS and in the case of WMS is that in the first case the tiles are generated in the server side whereas in the second case they are generated in the client side. This means that, in the case of WMS, the first time we visualize a specific zone at a given scale the response time is not specially good as data is accessed through the Internet, but the following time we visualize the same zone at the same scale the response time is appreciably higher. Thus, a good practice would be to pass all over the zone we are going to work with, at different scales, as a first step, so all the needed tiles are stored in the cache memory.

Another thing to take into account is the tile size. Each tile involves a network request so the lower is the tile size, the higher number of requests will be done and, thus, more time will be needed to load the whole view extent. It is important to say that this is not only a problem for users but also for servers. Making massive requests involves a strong work in the server side. For both reasons it is strongly recommended to configure a relatively high tile size (e.g. 1024) for the remote raster data source (WMS/WCS) within the menu Preferences>Tile cache.

We hope that you enjoy this two new features.

Posted in english, gvSIG Desktop | Tagged , , , | 2 Comments

gvSIG 2.0 on 64 bits or Java 1.7 systems

The gvSIG Desktop 2.0 version must work correctly on 64 bits systems, the problems of the previous versions don’t have to appear now.

gvSIG is developed on Java, and some parts of the application have been developed on C (raster management and reprojections). The parts of the source code developed on Java are multiplatform, and they work on 32 bits as well as on 64 bits. On the other hand, the part developed on C must be run in a 32 bits environment.

The 64 bits Windows systems as well as the Linux ones support a running mode where a 32 bits environment is simulated in a 64 bits machine when they detect that it’s trying to be run a 32 bits application. The problem that can happen is that the application that is really run by the Operative System is the Java Virtual Machine (JVM), and then it run the Java application.

In gvSIG 2.0 this problem has been solved, making gvSIG to run with a 32 bits Java Machine, in Windows as well as in Linux.

The only problem can appear in Linux, if the “Online installation” binary has been downloaded, where if it detects that the installed Java Machine is not the correct one, this message will appear:

Packages are installed that are not compatible with your system.

org.gvsig.raster.tilecache.app (linux/x86)
org.gvsig.crs.extension (linux/x86)
org.gvsig.raster.ermapper.app (linux/x86)
org.gvsig.raster.lizardtech.app (linux/x86)
...

Some are not specific to your system or architecture.

You may need to configure a 32-bit Java environment for the proper functioning of gvSIG.

If it happens, it’s recommended to install the “All included” binary, that will fix the problem.

On the other hand, some problems had been detected in some functionalities in the 1.x gvSIG versions when gvSIG run on a Java 1.7 Machine. The gvSIG 2.0 version is supported on this Java version.

Posted in english, gvSIG Desktop | 2 Comments

gvSIG 2.0: Additional feature for managing CRS

In early versions of gvSIG a support of CRS (Coordinate Reference System) was developed with basic functions and definitions. This implementation allows the user to select the reference system based on the datum, projection and time zone.
01CRS
However it has some limitations when applying transformations. Besides it doesn’t support, for instance, the time zones from the southern hemisphere.

Then a new version was developed based on GeoTools and Proj4 libraries, with many more features, CRS definitions, even with the option to allow users to create their own CRS.

02CRSHowever, the new extension had two problems:

  • While gvSIG is developed in Java language to allow the execution in multiple platforms, the usage of Proj4 which is a native library, lost that platform independence. Although Proj4 is available on multiple architectures and operating systems, it requires to generate different gvSIG installable for each of them. This increases the complexity and the maintenance of the gvSIG binaries.
  • That new support uses a local database to query the CRS supported, and require the installation of the library Proj4, along with their dependencies. This involves higher resource requirements (memory and hard disk) than in the previous support.

gvSIG Association has also recently developed a new project focused on educational environments: gvSIG Educa. Within this project includes gvSIG Batoví, which is the distribution that gives rise to gvSIG Educa. This distribution is driven by the Ministry of Transport and Public Works (MTOP) of the República Oriental del Uruguay and developed by the gvSIG Association and the Faculty of Engineering of the Universidad de la República (UdelaR), and focuses on the use of a Geographic Information System in educational environments for the PlanCeibal (Uruguay).
It is a gvSIG 2.0 desktop distribution to be installed on computers OLPC. These computers have limited resources, so it is not viable to use the CRS-based on Proj4. On the other hand the use of basic support is not possible, lacking to manage the time zones from the southern hemisphere.
Alternatively it was developed a new CRS support, using for that purpose the Proj4J library, which is a partial implementation of Proj4 in Java language, and it is independent of the operative system in which gvSIG is installed.
Functionally it allows to choose the CRS based on the authority and code, providing support for large number of definitions.

04This new support will be included on gvSIG Batoví distributions, as well as being available for  installing on gvSIG Desktop 2.0 through the add-ons manager plugin.
03CRSIn gvSIG Desktop 2.0 the three CRS implementations will be available. The basic implementation is included on gvSIG, and the other two can be installed as plugins. If the user install the three of them, the available one from the user interface will be Proj4. But if that one is not installed, the one that will be activated is the Proj4J one.

Posted in english, gvSIG Desktop | Leave a comment

gvSIG 2.0: Crear bibliotecas de símbolos (II)

En el post anterior vimos como crear una nueva biblioteca de símbolos a partir de una serie de ficheros de imagen. Una vez creada la biblioteca puede ser interesante compartirla con otros usuarios e incluso con toda la comunidad.

gvSIG 2.0 nos permite realizarlo con mucha facilidad ya que podemos generar un paquete que contenga la biblioteca e instalarlo en cualquier gvSIG desde el administrador de complementos.

¿Parece fácil, verdad? ¡Es que lo es!

Partiendo de la librería de símbolos creada en el post anterior, vamos a generar nuestro paquete.

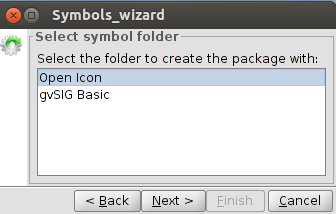
Para ello seleccionamos la opción “Create package” dentro del menú Tools/Symbols. Nos aparecerá una ventana como la siguiente:

201es

En ella vemos las diferentes bibliotecas de símbolos que tenemos disponibles en nuestro gvSIG, en nuestro caso “gvSIG Basic” que es la biblioteca que por defecto viene con la aplicación y “Open Icon” que es la que hemos creado. Seleccionamos está última y pulsamos “Next”.

A continuación nos muestra un formulario donde podemos rellenar los “metadatos” de nuestro paquete. Por ejemplo, en nuestro caso, quedaría algo similar a:

202es

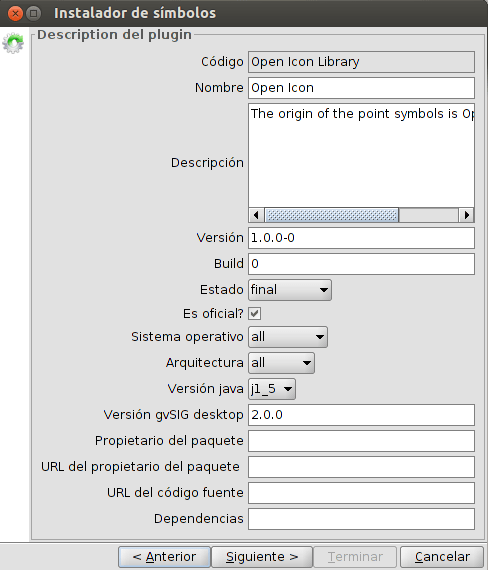
La opción “oficial” en principio no habría que marcarla en paquetes generados por la comunidad.

203_es

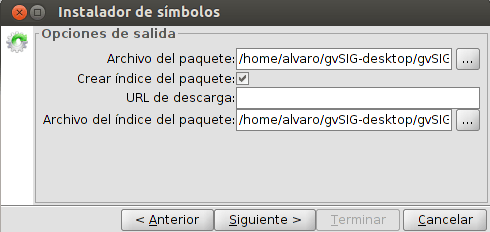
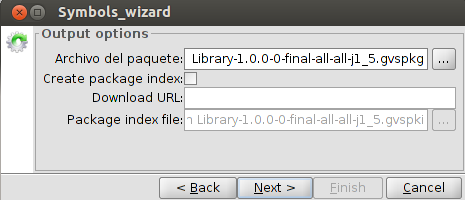
Veremos un cuadro de diálogo con 4 opciones a definir:

Archivo de paquete. Es la carpeta donde va a guardar el paquete que se genere. Por defecto los guarda dentro del directorio donde esté instalado gvSIG, en una carpeta “install” con un nombre que genera por defecto. En mi caso, que suele ser el habitual, se guarda en: “/home/usuario/gvSIG-desktop/gvSIG-desktop-2.0.0/install”. Lo dejamos sin modificar y ya sabemos donde tendremos que buscar el archivo de paquete resultante.

Ahora viene la única parte en la que tendremos que prestar un poco más de atención y sólo en el caso de que queramos compartir el paquete desde una URL determinada. Si no fuera el caso dejaríamos las opciones que vienen por defecto, y puedes saltarte los siguientes párrafos e ir directamente a “Ya tenemos nuestro paquete con la biblioteca de símbolos…”.

Crear índice del paquete. Activamos esta casilla sólo si vamos a compartir el paquete. El índice del paquete es un fichero GVSPKI útil para la instalación on-line de gvSIG. No es necesario en ningún otro caso.

URL de descarga. Este es el único paso al que debemos prestar atención, principalmente si queremos que el paquete esté disponible desde internet.

En nuestro caso, suponiendo que sea el servidor oficial donde estaría disponible: http://downloads.gvsig.org/download/gvsig-desktop/pool/base-symbols/

Y ahora debemos añadirle el nombre del paquete (que podéis copiar de la casilla “Archivo de paquete”). Por ejemplo, en nuestro caso en “Archivo de paquete” nos aparece:/home/alvaro/gvSIG-desktop/gvSIG-desktop-2.0.0/install/gvSIG-desktop-2.0.0-Open Icon Library-1.0.0-0-final-all-all-j1_5.gvspkg

Copiaríamos el nombre del paquete (gvSIG-desktop-2.0.0-Open Icon Library-1.0.0-0-final-all-all-j1_5.gvspkg) y quedaría algo similar a:

http://downloads.gvsig.org/download/gvsig-desktop/pool/base-symbols/gvSIG-desktop-2.0.0-Open Icon Library-1.0.0-0-final-all-all-j1_5.gvspkg”

Archivo del índice del paquete. Al igual que el “Archivo de paquete” nos índica el lugar donde va a guardar el fichero que genere.

Ya tenemos nuestro paquete con la biblioteca de símbolos que hemos creado listo para compartir.

Puedes hacer la siguiente prueba para saber que has realizado los pasos correctos (sin tener gvSIG abierto):

– Ves a carpeta personal y navega por “gvSIG/plugins/org.gvsig.app/Symbols”. Borra la carpeta “Open Icon”.

– Abrimos gvSIG y comprobamos que ya no existe dicha biblioteca de símbolos.

– Vamos al administrador de complementos (menú Herramientas/Administrador de complementos) y seleccionamos la opción de “instalación desde archivo (instalar complementos contenidos en un archivo .gvspki o .gvspks)”. Navegamos hasta donde tengamos nuestro archivo GVSPKS, que si no hemos cambiado nada será “/home/alvaro/gvSIG-desktop/gvSIG-desktop-2.0.0/install/gvSIG-desktop-2.0.0-Open Icon Library-1.0.0-0-final-all-all-j1_5.gvspkg “ y lo seleccionamos.

– Pulsamos siguiente y veremos que entre los paquetes disponibles está “Open Icon” y que incluye la descripción que le hemos dado. Lo instalamos y aunque nos indica que hace falta reiniciar en este caso no es necesario. Ya podemos comprobar que está disponible como biblioteca de símbolos.

En próximos post compartiremos algunas bibliotecas de símbolos que estamos creando para su uso por la comunidad y ampliaremos información sobre la creación de símbolos (como por ejemplo a partir de una fuente TTF).

Y, por supuesto, os animamos a que creéis vuestras propias bibliotecas de símbolos y las compartáis con toda la comunidad.

Posted in gvSIG Desktop, spanish | 10 Comments

gvSIG 2.0: Scripting, exploit your gvSIG

One of the novelties of the 2.0 version of gvSIG is the inclusion of a small environment for development and execution of scripts that interact with the application. These scripts allow us to automate small tasks or add some functionality that we need and that we can implement.

The language chosen by the gvSIG project to give support to scripting is Jython , an implementation of Python language that is ‘run’ in the Java Virtual Machine (JVM), allowing it to be fully integrated with gvSIG.

The default gvSIG installation has no base plugin to support the scripting, so the first thing we have to do is install it, you can consult how to do so in the gvSIG add-ons manager documentation.

The scripting plugin provides two tools, an editor and organizer of our scripts, Scripting Composer, and one that launches them, Scripting Launcher. These two tools are available in the Tools -> Scripting menu, and in two buttons on gvSIG the toolbar.

images/scripting-composer.png

As can be seen in the image the Composer is divided into 3 main zones, a file browser where we can see the scripts that are available, an edition area, and a notification area where we can see the incidents that occur during the execution of our scripts.

One of the advantages that the scripting extensions offers that is integrated in gvSIG is that it allows us to access the documents that we have loaded into the application and interact with them, which together with the re-factoring of the 2.0 gvSIG APIS and the libraries that have been created we can create scripts easily. We can see this through an example.

Suppose we have a loaded layer whose data structure has a field called ELEVATION and we want to obtain the maximum and minimum values ​​of this field. To do this we must go over all of the features of the layer and check the values ​​of this field, store the maximum and minimum value and display in a window.

from gvsig import *
from commonsdialog import *

def main(): 
  layer = currentLayer()
  if layer == None:
    msgbox("The layer should be charged and
              selected.", "NOTIFICATION", 1)
    return

  emax = 0.0
  emin = 0.0

  for feature in layer.features():
    if feature.ELEVATION > emax :
      emax = feature.ELEVATION
    if feature.ELEVATION < emin or emin ==0.0:
      emin = feature.ELEVATION
  msgbox("máximum Elevation=%s and minimum=%s" % (emax, emin),
         "Elevation", 0)

The result of running the script is can be seen in the below image:

images/script-ejecuted.png

We hope you enjoyed it and that it will inspire you to start coding your own scripts in Python and if so, and if you become somehow pythonicos maybe you would like to read the zen of python or better yet read your own script running in gvSIG. Will you tell us how?

Posted in development, english, gvSIG Desktop, scripting | Leave a comment

gvSIG 2.0. Caché de teselas para datos raster y servicio WMTS.

Los usuarios que habitualmente acceden a capas WMS saben bien que el tiempo de respuesta, cada vez que cambiamos el encuadre o la escala de visualización, no es despreciable. Si además tenemos varias capas WMS cargadas, este tiempo de respuesta se ve multiplicado tantas veces como capas tengamos, lo que puede llegar a requerir una cierta dosis de paciencia. gvSIG 2.0 trae dos novedades que en su conjunto mejoran la experiencia de usuario a la hora de acceder a datos raster remotos.

En primer lugar tenemos el soporte de WMTS (Web Map Tile Service). El servicio WMTS en un estándar OGC que tiene como objetivo precisamente solucionar los problemas de rendimiento mencionados del servicio WMS, mediante el uso de teselas. Las teselas son porciones de imagen que nos proporciona el servidor y que se almacenan en nuestro disco duro, quedando a partir de ese momento a disposición de la aplicación, la cual no tendrá que volverse a conectar al servidor en el futuro para cargar una zona que ya hemos visualizado con anterioridad, con el consiguiente incremento en la velocidad de carga. En el siguiente vídeo podemos ver a gvSIG accediendo a un servicio WMTS.

Aunque es de esperar que el número de servidores WMTS disponibles vaya en aumento no podemos negar que en la actualidad es muy inferior al número de servidores WMS, lo cual hace más interesante si cabe la segunda de las novedades de las que trata este post: la caché de teselas para datos raster

La caché de teselas para datos raster consiste en aplicar el principio del servicio WMTS, es decir, la gestión de teselas en memoria local, a la carga de datos raster en general, sea cual sea el tipo de fuente de datos. Así, uno de los beneficiados de esta novedad es el popular servicio WMS ya que gracias a esta funcionalidad el tráfico de datos a través de la red se reduce considerablemente y la velocidad de carga de los datos, por tanto, se incrementa. En el siguiente vídeo podemos ver la diferencia entre acceder a un servicio WMS con la opción de caché de teselas activada y con la opción no activada.

La diferencia entre la gestión de teselas que se realiza en el caso del servicio WMTS y la que se realiza en el caso del servicio WMS es que en el primer caso las teselas las proporciona el servidor mientras que en el segundo las genera gvSIG, es decir, que hay un proceso extra. Esto se traduce en que la primera vez que visualizamos una zona a una determinada escala mediante un servicio WMS el rendimiento no es especialmente bueno ya que la velocidad de refresco depende directamente de la velocidad con la que se cargan los datos a través de la red. A partir de ese momento, cada vez que volvamos a visualizar la misma zona notaremos cómo la velocidad de refresco es considerablemente mayor que la de la carga inicial. Por tanto una buena práctica sería la de dar una pasada por toda la zona con la que vamos a trabajar a distintas escalas de visualización, para que se carguen en la caché todas las teselas que posteriormente utilizaremos.

Otra cosa a tener en cuenta a la hora de utilizar la caché de teselas es que cada tesela supone una petición para el servidor con lo que cuanto menor sea el tamaño de las mismas, mayor número de peticiones se harán y por lo tanto más tiempo costará esa carga inicial. Interesará, por tanto, configurar un tamaño de tesela relativamente grande (e.g. 1024), lo cual puede hacerse desde Preferencias>caché de teselas>tamaño. Conviene decir que este no es el único inconveniente de utilizar un tamaño de tesela pequeño: solicitar un elevado número de teselas supone un considerable incremento de carga para el servidor hasta el punto de que algunos servicios recomiendan expresamente no realizar peticiones masivas. Por ambas razones es extremadamente recomendable utilizar un tamaño de tesela relativamente grande.

Posted in gvSIG Desktop, spanish | Tagged , , , , | 1 Comment