The gvSIG Desktop 2.2 version has a new editing extension with several improvements and new tools respecting the previous version (like the extend line to object or trim line by object tools).
One of the changes made at this new extension is the reference to object or snapping option. Like in the previous versions, it’s still available to elements of the same layer as well as to other vector layers that we have at the View. It makes the digitalization of new elements easy.
The difference between this version and the previous one is the location of the configuration options. It was at the “Editing properties” option of the active layer before, ann now, at the new editing extension it’s available in the following place:
Snapping type and tolerance for every view that we create
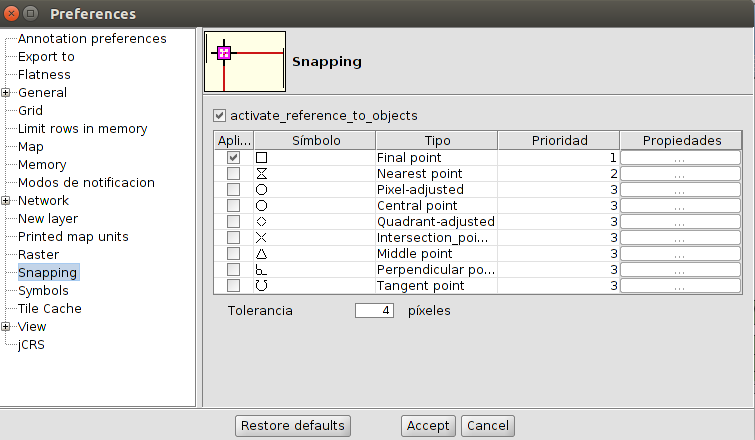
At this window, the type of snapping can be configured (end point, closest point…), and the tolerance in pixels that allows us to approach or move away from the different points of the line with the mouse, and to be recognized.
If the “Snap tolerance” is 4 pixels, two elements which are the same distance or closer than 4 pixels will be joined in a common coordinate.
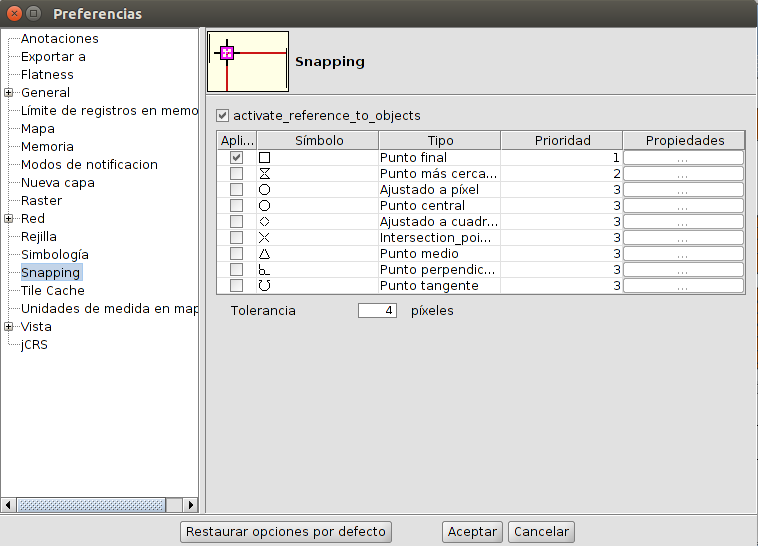
Now this tool is available at the gvSIG preferences (Show->Settings menu, “Snapping” option)
Here we can activate or deactivate snapping for every view in our project, and define the priority of every type, the order that we prefer it’s detected.
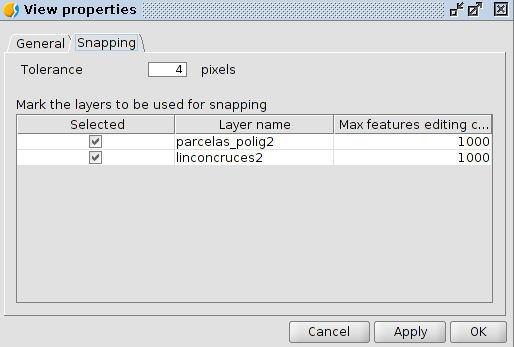
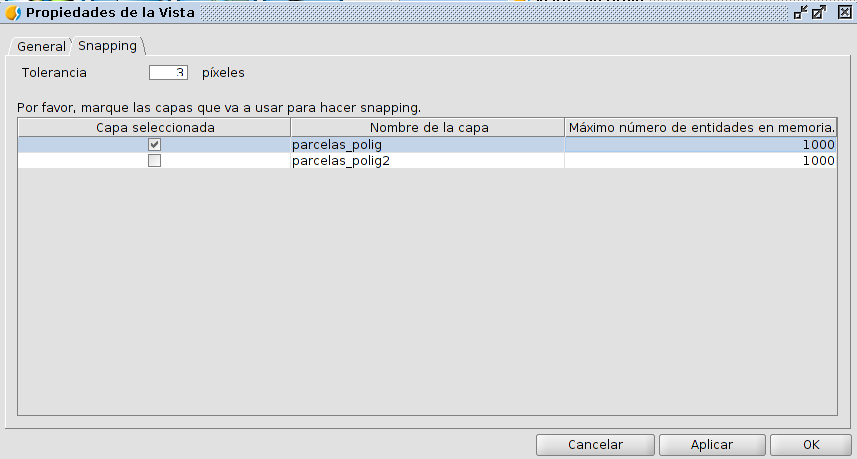
Layers to be used for snapping and tolerance in a concrete view
At this window the vector layers of our view can be selected to be used for snapping. The tolerance for that view can be selected too (the tolerance by default will be the selected at the Settings menu, and here we can change it only for that view).
Another configuration possibility is to select the maximum number of features to keep in memory, in order to accelerate the snapping in editing mode. It’s the maximum number of entities that we want to have in memory in our computer.
This option is at the View properties now (View->Properties menu, Snapping tab).
En la versión 2.2 de gvSIG Desktop se incluyó una nueva extensión de edición, con bastantes mejoras y nuevas herramientas respecto a la anterior (como por ejemplo alargar línea hasta un objeto o recortar línea por un objeto).
Uno de los cambios realizados en esta nueva extensión es la opción de referencia a objetos o snapping. Al igual que en las versiones anteriores, sigue estando disponible, tanto a elementos de la misma capa que se está editando, como a otras capas vectoriales que tengamos en la Vista. Esto nos facilita la digitalización de nuevos elementos.
La diferencia respecto a la versión anterior es la ubicación de las opciones de configuración de la herramienta. Antes estaban disponibles en las “Propiedades de edición”, en el menú contextual sobre la capa en edición activa. Con la nueva edición, se ha dividido en dos partes, y su nueva ubicación es la siguiente:
Tipo de snapping y tolerancia para todas las vistas que creemos
En esta ventana se puede configurar a qué tipo se haría el snapping (punto final, punto medio, punto cercano…), y la tolerancia en píxeles que nos permite acercarnos más o menos a los distintos puntos con el ratón y que sean reconocidos.
Si la tolerancia es por ejemplo de 4 píxeles, dos elementos que se encuentren a una distancia igual o menor a 4 píxeles se unirán en una coordenada común.
Esta herramienta se encuentra ahora en las preferencias de gvSIG (menú Mostrar->Configuración, opción “Snapping”)
Aquí podremos activar o desactivar la referencia a objetos para todas las vistas, y definir también la prioridad que tendría cada tipo, qué preferimos que detecte antes o después.
Capas sobre las que se hará el snapping y tolerancia en una vista concreta
En esta ventana se podrán seleccionar las capas vectoriales de la vista en la que estamos, sobre las que se hará el snapping. También se puede configurar la tolerancia para dicha vista (por defecto será la que tenemos en las preferencias, y aquí podremos cambiarla solo para esa vista).
Otra posibilidad de configuración es, para cada capa, el número máximo de entidades que puede tener en memoria, para acelerar los snappings en edición. Es el número máximo de geometrías con el que se quiere trabajar en memoria.
Esta opción se encuentra ahora en las propiedades de la Vista (menú Vista/Propiedades, pestaña Snapping).
Some time ago a collaborator, Mario Fèvre, from TreCC company, started a new project to generate a new icon set for gvSIG with the aim to have a friendlier interface.
This project not only consist in designing that new icon set, but creating a style guide or manual, that allow developers to design the future icons to be included in gvSIG in a normalized way.
An excellent work that you can see now, and of course giving your opinion.
Here you have the link to the first version of this style guide that contains the groups of icons that have been created already: Style guide (PDF in Spanish)
It’s planned to continue with the design of the icons related to Tables, Layouts and Charts.
From our part, gvSIG will have the possibility to select the different icon sets, and the user will be able to use the current one or other sets like the presented one in this post.
We want to thank Mario for his work and congratulate him for the professionalism.
There’s a useful geoprocess to clip simple lines and create a separation at the intersections with other lines. This geoprocess is run on the whole layer, checking the intersections between all the polylines. We can need it to calculate intersection, lengths, selections…
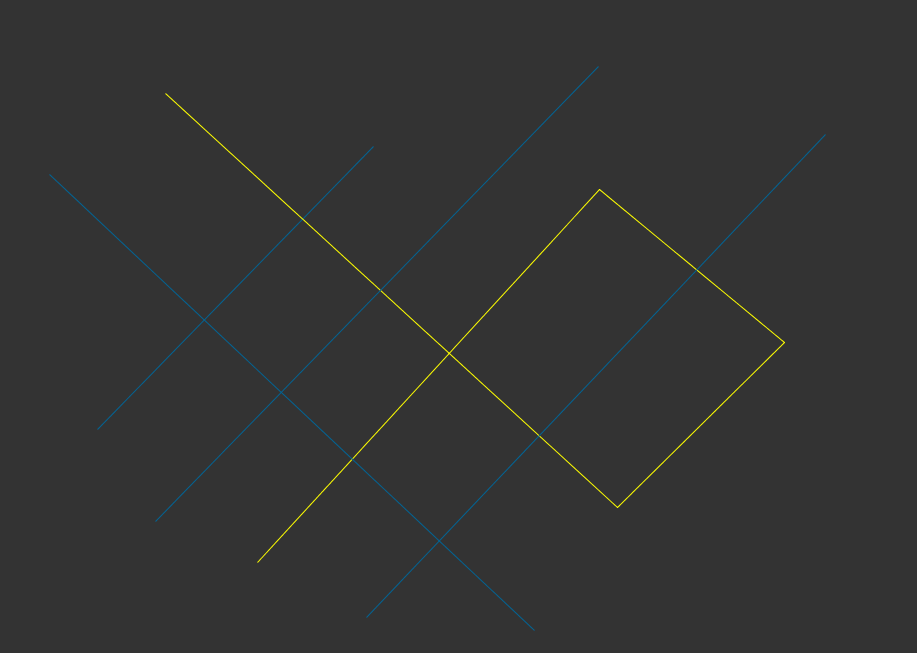
We would run the script when we have a file with polylines similar to this image:
Una única entidad seleccionada.
We would get a results like this one, a layer with clipped lines:
Varias entidades seleccionadas divisiones de la anterior. Todas las polilíneas están partidas de igual modo.
This geoprocess is similar to the ‘v.clean-break’ tool of GRASS.
The source code of the script is this one, you only will have to change the path to the output file.
import gvsig
import os
from geom import *

def main():
    clean_break(gvsig.currentLayer(), "C:/temp/")

def clean_break(layer, path):
    output = crearCapa_cleanBreak(layer, path)

    features = layer.features()
    for f in features:
        geom = f.geometry()
        values = f.getValues()
        numVertex = geom.getNumVertices()

        for i in range(0,int(numVertex) - 1):
            ver1 = geom.getVertex(i)
            ver2 = geom.getVertex(i+1)
            listVertex = []
            listVertex.append((ver1, 0))
            listVertex.append((ver2, ver2.distance(ver1)))
            lineGoingDivided = createGeometry(2)
            lineGoingDivided.addVertex(ver1)
            lineGoingDivided.addVertex(ver2)
            for n in layer.features(): #getSelection():#.features():
                    geomN = n.geometry()
                    numVertexN = geomN.getNumVertices()
                    for ni in range(0,int(numVertexN) - 1):
                        ver1n = geomN.getVertex(ni)
                        ver2n = geomN.getVertex(ni+1)
                        lineGoingCross = createGeometry(2)
                        lineGoingCross.addVertex(ver1n)
                        lineGoingCross.addVertex(ver2n)
                        if lineGoingCross == lineGoingDivided:
                            pass
                        if lineGoingCross.crosses(lineGoingDivided):
                            point = lineGoingCross.intersection(lineGoingDivided)
                            if str(point)== "MultiPoint2D":
                                print "Error: Interseccion multipunto"
                                #nGeometries = point.getGeometries()
                                #for nG in nGeometries:
                                #    if lineGoingDivided.crosses(nG) and n.crosses(nG):
                                #        listVertex.append((nG, nG.distance(ver1)))
                            elif point.type == 1: #de tipo punto
                                #print "Normal insertion"
                                listVertex.append((point, point.distance(ver1)))
                            else:
                                print "Error Pass, geometry type: ", point.type
                                pass

            sortedVertex = list(sorted(list(set(listVertex)), key=lambda vertex: vertex[1]))

            # "Creacion de menores"
            if len(sortedVertex) >= 2:
                for l in range(0, len(sortedVertex)-1):
                    tramo = createGeometry(2)
                    tramo.addVertex(sortedVertex[l][0])
                    tramo.addVertex(sortedVertex[l+1][0])
                    values["GEOMETRY"] = tramo
                    output.append(values)

    output.commit()
    gvsig.currentView().addLayer(output)
    return output

def crearCapa_cleanBreak(layer, path="C:/temp/"):
   nombre = "clean_break"
   numero = 0
   #TIP
   while True:
       archivo = nombre + str(numero)
       ruta = path + archivo + ".shp"
       if os.path.exists(ruta):
           numero +=1
       else: break
   #/TIP

   CRS = gvsig.currentProject().getProjectionCode()
   schema = gvsig.createSchema(layer.getSchema())
   #schema.append("GEOMETRY","GEOMETRY")
   output = gvsig.createShape ( schema, ruta, CRS=CRS,
       geometryType= LINE)
   return output
Un geoproceso que podemos necesitar es el de partir polilíneas en líneas simples, y además, generar una división en ellas por cada intersección con otra línea. Este geoproceso se ejecuta sobre toda la capa, comprobando las posibles intersecciones entre todas las polilíneas. Lo podemos necesitar para calcular intersecciones, longitudes, selecciones, etc.
Ejecutaríamos el script teniendo un fichero lleno de polilíneas que se superponen similar al de la imagen:
Una única entidad seleccionada.
Obtendríamos un resultado como el siguiente, una capa de líneas partidas:
Varias entidades seleccionadas divisiones de la anterior. Todas las polilíneas están partidas de igual modo.
Este geoproceso es similar al correspondiente utilizado por GRASS de ‘v.clean-break’.
Si estás interesado en aprender a realizar estas operaciones espaciales y mucho más, apúntate ya en el MOOC de Scripting en gvSIG 2. Curso gratuito y en abierto, con mucha actividad en los foros, siendo opcional la obtención del certificado.
El código del script es el siguiente, el único valor que deberás de cambiar es el correspondiente a la ruta del fichero de salida.
import gvsig
import os
from geom import *

def main():
    clean_break(gvsig.currentLayer(), "C:/temp/")

def clean_break(layer, path):
    output = crearCapa_cleanBreak(layer, path)

    features = layer.features()
    for f in features:
        geom = f.geometry()
        values = f.getValues()
        numVertex = geom.getNumVertices()

        for i in range(0,int(numVertex) - 1):
            ver1 = geom.getVertex(i)
            ver2 = geom.getVertex(i+1)
            listVertex = []
            listVertex.append((ver1, 0))
            listVertex.append((ver2, ver2.distance(ver1)))
            lineGoingDivided = createGeometry(2)
            lineGoingDivided.addVertex(ver1)
            lineGoingDivided.addVertex(ver2)
            for n in layer.features(): #getSelection():#.features():
                    geomN = n.geometry()
                    numVertexN = geomN.getNumVertices()
                    for ni in range(0,int(numVertexN) - 1):
                        ver1n = geomN.getVertex(ni)
                        ver2n = geomN.getVertex(ni+1)
                        lineGoingCross = createGeometry(2)
                        lineGoingCross.addVertex(ver1n)
                        lineGoingCross.addVertex(ver2n)
                        if lineGoingCross == lineGoingDivided:
                            pass
                        if lineGoingCross.crosses(lineGoingDivided):
                            point = lineGoingCross.intersection(lineGoingDivided)
                            if str(point)== "MultiPoint2D":
                                print "Error: Interseccion multipunto"
                                #nGeometries = point.getGeometries()
                                #for nG in nGeometries:
                                #    if lineGoingDivided.crosses(nG) and n.crosses(nG):
                                #        listVertex.append((nG, nG.distance(ver1)))
                            elif point.type == 1: #de tipo punto
                                #print "Inserción normal"
                                listVertex.append((point, point.distance(ver1)))
                            else:
                                print "Error Pass, geometria tipo: ", point.type
                                pass

            sortedVertex = list(sorted(list(set(listVertex)), key=lambda vertex: vertex[1]))

            # "Creacion de menores"
            if len(sortedVertex) >= 2:
                for l in range(0, len(sortedVertex)-1):
                    tramo = createGeometry(2)
                    tramo.addVertex(sortedVertex[l][0])
                    tramo.addVertex(sortedVertex[l+1][0])
                    values["GEOMETRY"] = tramo
                    output.append(values)

    output.commit()
    gvsig.currentView().addLayer(output)
    return output

def crearCapa_cleanBreak(layer, path="C:/temp/"):
   nombre = "clean_break"
   numero = 0
   #TIP
   while True:
       archivo = nombre + str(numero)
       ruta = path + archivo + ".shp"
       if os.path.exists(ruta):
           numero +=1
       else: break
   #/TIP

   CRS = gvsig.currentProject().getProjectionCode()
   schema = gvsig.createSchema(layer.getSchema())
   #schema.append("GEOMETRY","GEOMETRY")
   output = gvsig.createShape ( schema, ruta, CRS=CRS,
       geometryType= LINE)
   return output
Hace un tiempo os comentamos que un colaborador, Mario Fèvre de la empresa TreCC, ponía en marcha un nuevo proyecto para generar un nuevo juego de iconos en gvSIG con el objetivo de generar una interfaz más amigable para gvSIG.
Este proyecto no consiste únicamente en diseñar ese nuevo juego de iconos, sino en acompañarlo de un estudio a modo de manual o guía de estilo, que permita a los desarrolladores diseñar de forma normalizada los futuros iconos que se vayan incorporando al programa.
Un trabajo excelente al que ya podéis comenzar a dar un vistazo y, por supuesto, opinar sobre el mismo.
Os dejamos el enlace a la primera versión de esta guía de estilo que contiene información de los grupos de iconos ya elaborados: Guía de estilo (PDF)
En los próximos meses está previsto continuar avanzando con el diseño de los iconos relacionados con Tablas, Mapas y Gráficas.
Por nuestra parte tendremos preparado gvSIG para que el usuario pueda seleccionar entre distintos juegos de iconos, pudiendo utilizar el actual u otros juegos de iconos como el que aquí se presenta.
Aprovechamos este post para agradecer a Mario su trabajo y felicitarle por la profesionalidad del mismo.
El objetivo del taller es mostrar las posibilidades del uso de gvSIG, con utilización complementaria de otros SIG libres, para realizar un análisis de distintos tipos de delito.
Este taller se enmarca dentro de la iniciativa de desarrollo de un nuevo producto -gvSIG Crime- basado en gvSIG y orientado a la criminología.
El índice de contenidos del taller es el siguiente:
Breve descripción de la criminología ambiental.
Metodología de investigación de ecología criminal por medio de Matrices Espaciales de Datos.
Principales peligros del análisis ecológico: falacia ecológica, COSP -change of support problem-, MAUP –modifiable areal unit problem-. Elección de retícula.
Preparación de la base en gvSIG
Uso del archivo con algoritmos SAGA y Geoda.
Retorno de la información a gvSIG.
Discusión del producto.
Recordar que los talleres son gratuitos, al igual que todas las actividades de las jornadas, y que para asistir necesitáis realizar vuestra inscripción a las jornadas mediante el siguiente enlace:
En el caso de España, el sistema oficial desde 1970 hasta el año 2007 era el ED50, y la cartografía se generaba normalmente en este sistema de referencia.
A partir de 2007 se establece ETRS89 como sistema de referencia geodésico oficial en España para la referenciación geográfica y cartográfica en el ámbito de la Península Ibérica y las Islas Baleares, con lo que la cartografía que se genera a partir de ese momento ya debe hacerse en el nuevo sistema.
En el caso de las Islas Canarias, se adopta el sistema REGCAN95, ya que ETRS89 sólo afecta a la parte estable de la placa eurasiática.
Este cambio de sistema de referencias puede provocar que tengamos cartografía en los dos sistemas, ofrecida por organismos distintos, y que queramos visualizarla en una misma Vista en gvSIG para poder realizar algún análisis.
Como comentamos en el post anterior, los sistemas de referencia en gvSIG vienen designados por códigos, siendo el sistema más utilizado el EPSG.
Para el sistema antiguo, ED50, los códigos EPSG correspondientes serían:
4230, para coordenadas geográficas.
230xx, para UTM, donde “xx” es el huso correspondiente. España está incluida en los husos 28 (Islas Canarias), 29 (Galicia), 30 (Centro de España y España occidental), y 31 (España oriental e Islas Baleares), por lo que serían 23029, 23030…
Para el nuevo sistema, ETRS89, los códigos EPSG correspondientes serían:
4258, para coordenadas geográficas.
258xx, para UTM, donde “xx” es el huso.
Si disponemos de cartografía en los dos sistemas, si no reproyectamos una de ellas no las veremos correctamente una sobre otra en la misma Vista.
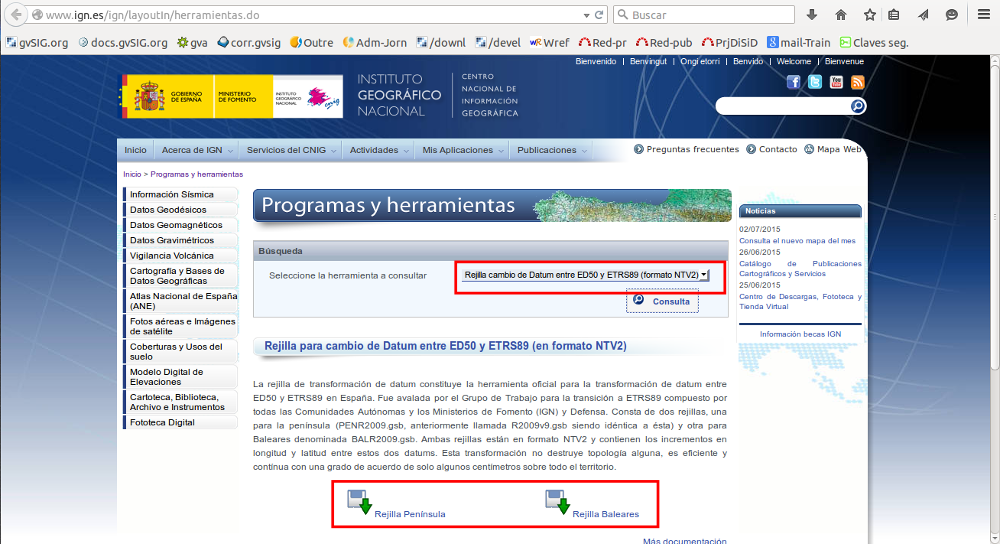
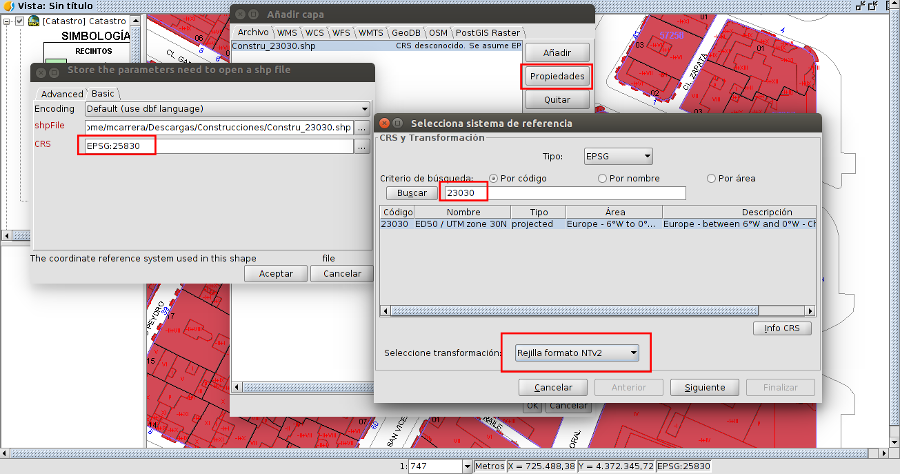
Para la reproyección entre estos sistemas, para no perder la precisión original, será siempre necesario aplicar una transformación estrictamente conforme. Para ello, el Instituto Geográfico Nacional (IGN) de España facilita una rejilla de transformación de datum, que constituye la herramienta oficial para la transformación de datum entre ED50 y ETRS89 en España. Esta rejilla está en formato NTv2, reconocido por gvSIG, y puede descargarse desde el apartado de Programas y herramientas de la página web del IGN.
Los pasos a seguir para la reproyección de una capa entre estos sistemas son los mismos indicados en el post anterior, de Reproyección de capas ráster y vectoriales, pero en el momento de seleccionar el sistema de referencia de la capa a agregar, debemos seleccionar en la parte de abajo la opción de Transformación por Rejilla en formato NTv2.
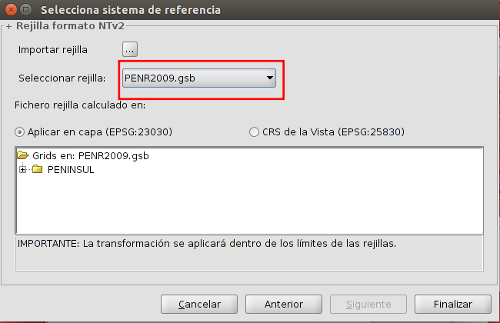
En la siguiente ventana deberemos importar la rejilla descargada primero (solo lo haremos la primera vez, después ya nos aparecerá en el desplegable), y seleccionarla.
Siguiendo estos pasos tendremos reproyectada la capa vectorial en la Vista, pero esta reproyección será al vuelo, por lo que si queremos tenerla en el nuevo sistema de referencia, en el de la Vista, se deberá exportar dicha capa a un nuevo fichero, como comentamos en el post anterior.
The convention was attended by over 100 participants from all over the country representing both the public administration, commercial companies and universities.
Participants could hear and see nearly 30 presentations, including those regarding:
free GIS software and its licensing,
open standards in geographic information,
open and gratuitous geospatial data,
official public geoportals,
Open Street Map,
Linked Open Data,
certification of skills in the field of GIS.
During the convention was held a presentation about gvSIG titled: “The project gvSIG. Software for various applications“, in which you could take a look at the main features of gvSIG software as well as other products of gvSIG project.
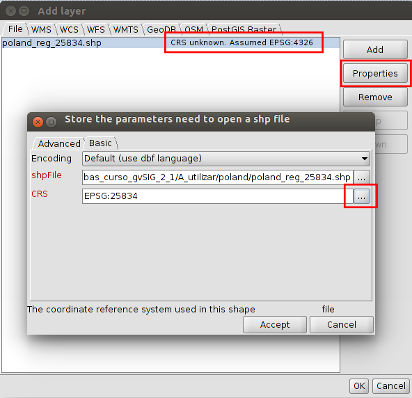
When we download cartography from a web page we need to know its reference system in order to load it correctly in gvSIG. For that we have to look for it at the same web page, or access to the metadata if they are published.
The reference systems are designed by codes in gvSIG, and EPSG is the most used code (managed by the International Association of Oil & Gas Producers – IAOGP). If we don’t know the EPSG code of our reference system, we can search it in gvSIG by Name or by Area. We also can look for it at the next EPSG codes list.
When we are working on gvSIG we must select the reference system of the View that we are creating. Then, when we add a layer, if it’s at the same reference system than the View we will add it directly, and it will appear on the correct location.
Nevertheless, if it’s in a different reference system, we will act differently for raster or vector layers.
Reprojecting vector layers
If our vector layer is in a different reference system than the View one, we must indicate it when loading (we also can select the transformation to be applied in order to adjust the reprojection). As gvSIG detects that it’s a different reference system it will be reprojected on the fly.
This reprojection will be, as we said, “on the fly”, that means, the layer will be at its original reference system yet.
If we want to have that vector layer at the same reference system than the View, once it’s reprojected on the fly, we must export it to a new file (Layer->Export to menu)
That new file that we have saved on our computer will be on the new reference system, the same system than the View, so if we load it on the same View we won’t have to indicate its reference system, assuming the same than the View. It will be loaded correctly already.
Note: If we make any geoprocess on the ‘reprojected on the fly’ layer, we won’t get the correct results because it’s made on the layer on its original system. For that we must do it on the exported layer.
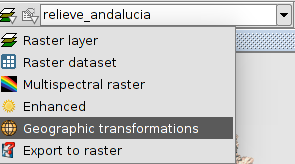
Reprojecting raster layers
If we have a raster layer that is in a different reference system than the View, gvSIG can’t reproject it at the same way than the vector layers.
If we want to reproject a raster layer to the same reference system than the View we will load it on the View directly (it won’t be loaded correctly), and we will use the “Reproject raster layer” tool.
For that we will open the raster tools main menu (we must click on the white triangle that is in the button), and then select the “Geographic transformations” option.
Once this option is selected, we open the menu at the right side, and we select “Reproject layer”.
At the new window, we select the source projection of the layer, and the target projection, that will be the same than the View one (selecting the transformation if we know it and we want to adjust the reprojection). We will select the name of the reprojected system and where it will be saved.
When we accept it, we indicate that it has to add the layer to the View, so it will be at the same reference system than the View. We will remove the old layer, and zoom to the new one.
How to check which is the reference system of a layer
If we have a layer, and we don’t know its reference system like we told at the beginning, and we don’t have the prj file with that information, we can use reference cartography to check it.
Most of the WMS services offer the layers in several reference systems, in the official ones of the offered area normally, so that we can use them for checking it.
For that we will open a View in gvSIG, that will be in a concrete reference system (one of the systems that we think our layer can be). Then we will load a WMS layer at the same system (it’s recommendable to use some layer that offers lots of details, like cadastral cartography). We will load our layer finally, assuming that it’s in the same reference system than the View, and if it coincides, the layer will be in that reference system.
In case it doesn’t coincide, we’ll do the same operation with another View in other reference system, and loading the WMS layer in that system.


 On 11-12 June in Szczyrk (Poland) took place
  During the convention was held a presentation about gvSIG titled: “