Names of icons, menus and actions on gvSIG 2.0 (I)

One of the goals we set in the development phase of the 2.0 version of gvSIG was to improve usability. This is a field in which there is always room for improvement and that involves making changes on many fronts. One of those fronts are the issues regarding menus and icons where two objectives were set: to relocate the menu entries and icons, and provide to gvSIG the ability to exchange its set of icons. Currently we have achieved the first of these goals and we are very close to getting the second one.

We started with this post, a series dedicated to describe the work done in this field.

The key to exchange sets of icons is the standardizing of their names. While there are some naming rules for generic application icons, we found no specific for GIS icons. In this situation we decided to do the following:

  1. Choose a standard naming rule.
  2. Define names for the needed GIS icons based on the criteria used in the chosen standard.
  3. Attempt to register new names in the standard.

After analyzing several alternatives we decided to start working with freedesktop.org as a reference, as it is a standard used among other free software projects, by KDE and GNOME.

Since we had to rename all the icons of gvSIG, one of the first tasks to be done was to identify all the icons used by the application at that time. With the help of Mario Fèvre (TReCC), active project partner and member of the working group of usability, we did an initial list of icons, distinguishing those belonging to the toolbar (which were, in fact, our goal) from other icons. After detecting that this list had some icons that were not actually used (from older versions) it was decided that the final list was necessary made by a gvSIG developer.

Once a reliable list of the icons used in gvSIG 2.0 got ready, the next step was to establish a criteria for naming them. At this point we realized that before standardize the names of the icons we had to standardize the names of the actions to which they refer. In most cases the name of the icon and the action are the same, but in some other cases the same icon can be associated to different actions (for example, the “copy” icon does not the same if we are in a gvSIG view that if we are on a map, the actions are different but the icon is the same).

On the other hand, based on recommendations from freedesktop.org, we deduced that the names of the icons are closely related to the arrangement of the menu entries as these are organized by levels of specificity. Thus, the name of an icon – better said its action – would correspond to the concatenation of the different levels of a given input menu. Just taking a look at the names already registered in freedesktop.org, it is easy to see that the names of the icons match, in most cases, with the concatenation of the menu entries.

We finally decided that the next task to perform would be to define all menu entries and only then, define the actions and the names of the icons. In order to finish the standardization work, it would also be advisable to define each tooltip of the application (tooltips are descriptive labels that appear when the mouse pointer is held over an icon).

The position of the menu entries, therefore, was another key work. To set the new position of them, we rely on a complete analysis for the reorganization of menus that was done time ago by the project ‘s usability group. This group includes both gvSIG team members and external partners. This analysis is also based on standards and style guides widely used.

Thanks to this work, gvSIG 2.0 has its menu entries and icons placed in a more logical and natural (and therefore more intuitive) place, as well as standard icon names. We hope that, in future versions of gvSIG, the icons could also be exchanged.

But all this work would be useless if we do not ensure that future developments follow the naming rule set. To achieve that goal we have also defined a procedure that will be the issue of upcoming posts to this blog.
Posted in development, english, gvSIG Desktop | 1 Comment

gvSIG 2.0: Mapas temáticos (II)

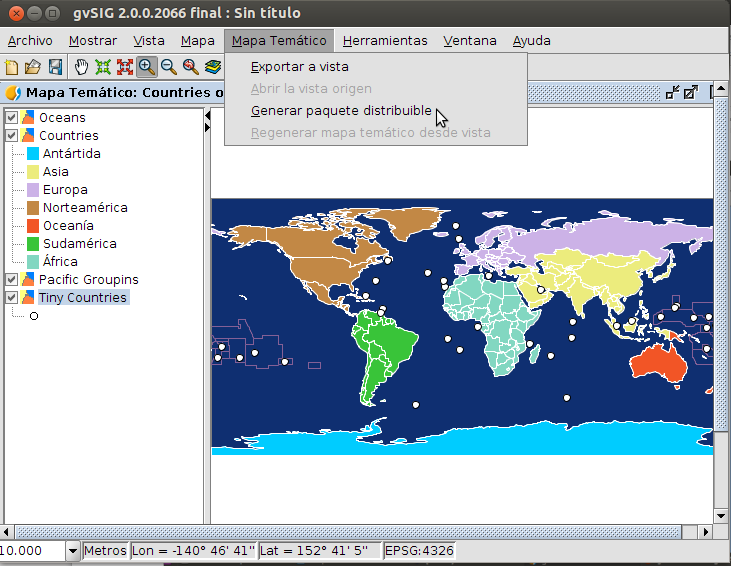
En este nuevo post de la serie “Mapas temáticos” veremos como generar un paquete para compartir un mapa temático con otros usuarios.

En el post anterior habíamos generado nuestro primer mapa temático, que se habrá guardado por defecto en: home/usuario/gvSIG/plugins/org.gvsig.educa.thematicmap.app.viewer/thematicMaps

De este modo en cualquier proyecto gvSIG puedo abrir un “Mapa temático” ya creado. Basta con pulsar “Nuevo” sobre el documento “Mapa Temático” desde el “Gestor de proyecto”. Esto nos abrirá una ventana con un listado de todos los mapas temáticos que tenemos disponibles. Esto nos sirve para acceder a los mapas temáticos desde cualquier proyecto propio de gvSIG, pero no para compartir los mapas temáticos con otros usuarios. Para compartir el mapa temático debemos generar un paquete.

En primer lugar debemos saber que al generar un paquete de mapa temático vamos a obtener un fichero instalable desde el administrador de complementos de cualquier gvSIG 2.0. ¿Qué contiene este paquete? Contiene la cartografía (los ficheros), contiene las leyendas, contiene el etiquetado, contiene las escalas máximas y mínimas de visualización de cada capa, contiene el color de fondo,…contiene en definitiva todo el mapa temático listo para distribuir.

El proceso es tan sencillo como seleccionar la opción en el menú correspondiente: Mapa Temático/Generar paquete distribuible Mapa Tematico_Paquete01

Se nos abrirá una ventana donde simplemente debemos indicar el directorio donde guardar el paquete (el nombre lo generará automáticamente). En nuestro caso ha generado un paquete con el nombre: ThematicMap-World_Countries-1-BN1.gvspkg

Listo para enviar.

Por si queréis probarlo, este paquete y alguno más están disponibles en el apartado del outreach que tiene como objetivo ser un catálogo de mapas interesantes para los usuarios de esta extensión de gvSIG y de gvSIG Educa: http://outreach.gvsig.org/maps

Por cierto, si queréis contribuir a alimentar este apartado, no tenéis más que seguir las instrucciones: http://outreach.gvsig.org/contribute

Si eres el receptor de un paquete de Mapa temático y te interesa el proceso inverso: convertir el Mapa temático en una Vista (para poder cambiar su leyenda, editarlo…) simplemente debemos seleccionar la opción del menú: Mapa temático/Exportar a vista.

Nos pedirá un directorio donde guardar los ficheros (importante: debe estar vacío) y automáticamente nos creará la Vista equivalente a ese mapa temático.

Eso ha sido todo por hoy…En el siguiente post de esta serie veremos como generar un paquete de un conjunto de paquetes, es decir, como compartir conjuntos de mapas temáticos en un sólo fichero.

Posted in gvSIG Desktop, spanish | Tagged , , | 2 Comments

gvSIG 2.0: “Crime” symbols library

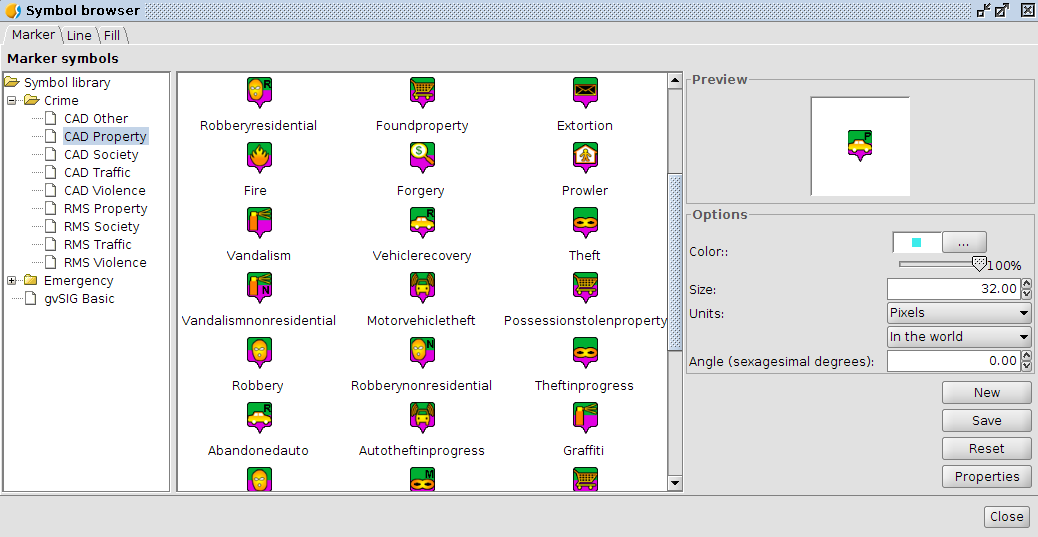
Some weeks ago we published a symbols library oriented to emergency management, both at a urban level and a natural disaster level. As a complement and in order to ease the representation of symbols for those gvSIG users who are related with criminology and delictual analysis, we have created a new symbols library. Crime01Crime_02

In this case we created the line and fill symbols manually and for the marker symbols we used the text font called “CMS. The Crime Mapping Symbology”.

These public domain symbols were designed for the US Justice Department specifically for meeting the needs of the police department about symbology, although due to its thematics, it can be also used for other departments as fire fighters. CMS includes itself two symbol sets called “Computer Aided Dispatch (CAD)” and “Records Management System (RMS)”.

We generated the different selection symbols with GIMP. In this case, as there were some yellow symbols, we decided that the selection symbols were in grayscale. Doing Image/Mode/Grayscale we converted the original symbols to grayscale ones, adding “_sel” to the file name in order that gvSIG can use it automatically.

These symbols are designed to be used at a size of 32 pixels, although we still can view them correctly if we make them smaller. Crime03This package is available within the gvSIG addons manager (selecting the URL http://downloads.gvsig.org/download/gvsig-desktop/ and searching by “Types/symbols”) or directly downloading the package from here.

Posted in english, gvSIG Desktop | Tagged , | Leave a comment

gvSIG 2.0: Biblioteca de símbolos “OCHA-Humanitarian”

Comentabamos en un anterior post el uso cada vez más frecuente de gvSIG en el ámbito de la protección civil y la gestión de emergencias. A raíz de la publicación de la Biblioteca de símbolos “Emergency”, recibimos información por dos sitios distintos sobre la existencia de un juego de símbolos que sería muy interesante incorporar en gvSIG.

Se trata del conjunto de símbolos creado por la Oficina de Naciones Unidas para Coordinación de Asuntos Humanitarios (OCHA) para fines humanitarios, con el objetivo de ayudar a los trabajadores y voluntarios a presentar e interpretar la información sobre las emergencias y las crisis de forma rápida y sencilla.

Cuando ocurre un desastre, es vital que todos los diferentes organismos humanitarios y los trabajadores pueden obtener información precisa sobre las necesidades de las personas afectadas y las localizaciones y recursos disponibles para ayudarlos. Este conjunto de símbolos es, en cierto modo, el estándar de la simbología de emergencias.

Como comentaba nos llegó la información por dos vías distintas, una de ellas, un organismo de protección civil que nos comentaba que había tenido que pagar para poder incorporar esos símbolos en un SIG privativo de cuyo nombre no quiero acordarme. Y, por supuesto, comentamos lo importante y útil que sería disponer de estos símbolos en gvSIG. Dicho y hecho.

Hemos generado la biblioteca, incluyendo los símbolos con marco blanco y marco de color, y generando varias subcarpetas, primero por los colores utilizados habitualmente (blanco, azul, verde y rojo) y segundo por la temática. En definitiva, hemos mejorado lo que ese organismo tuvo que pagar por tener este conjunto de iconos disponibles en un SIG privativo, donde parece que (también en estos casos) el dinero está por encima de todo.

OCHA_01Son cientos de símbolos que gracias a las nuevas herramientas que trae gvSIG 2.0, hemos incorporado en unos pocos minutos en nuestro gvSIG.

Hemos complementado la biblioteca, como es habitual, con una serie de símbolos lineales y poligonales que pueden ser de utilidad para representar la gravedad de un determinado fenómeno e inspirados en distintos mapas realizados por organizaciones humanitarias.

OCHA2OCHA_03Este paquete lo tenéis disponible desde el administrador de complementos (seleccionando la URL http://downloads.gvsig.org/download/gvsig-desktop/ y buscando por “Tipos/symbols”) o directamente descargándoos el paquete desde aquí.

Esperamos que esta nueva biblioteca sea de utilidad y que, realmente, no sea necesario utilizarla en muchas ocasiones.


Posted in gvSIG Desktop, spanish | Tagged , | 2 Comments

gvSIG 2.0: Thematic Maps II

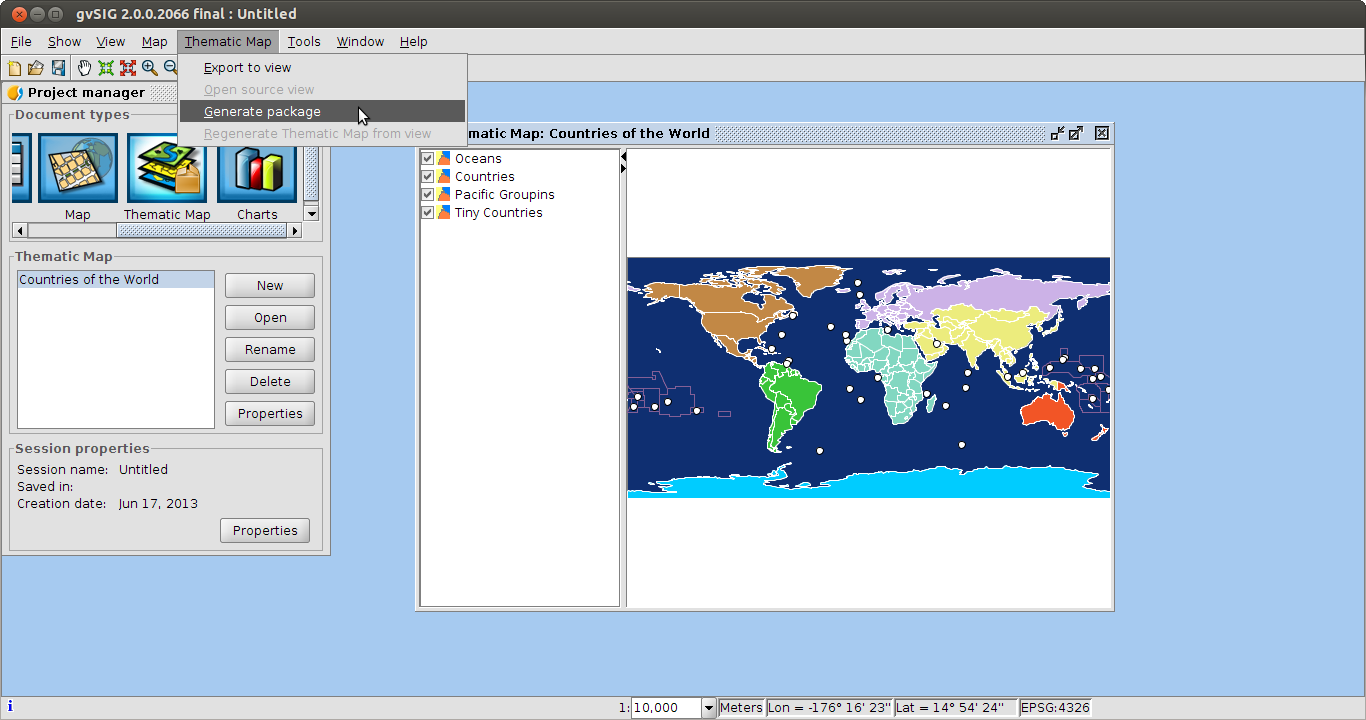
At this new post of the “Thematic maps” series we will see how to generate a package for sharing a thematic map with other users.

In the previous post we had generated our first thematic map, that will have been saved by default in home/usuario/gvSIG/plugins/org.gvsig.educa.thematicmap.app.viewer/thematicMaps.

At this way, in any gvSIG project we can see a “Thematic map” that has been created already. We only have to press “New” on the “Thematic Map” document from the “Project Manager”. This will open a window with a list of all the thematic maps available. It will allow us to access to the thematic maps from any gvSIG project, but not for sharing the thematic maps wirh other users. To share the thematic map we will have to generate a package.

Firstly we must know that when a thematic map package is generated we are going to get an install file from the add-ons manager of any gvSIG 2.0. What does this package contain? It contains the cartography (the files), the legends, the labelling, the maximum and minimum scale of viewing of each layer, the background colour…, it contains the complete thematic map ready to be shared.

The process is as easy as selecting the option in the corresponding menu: Thematic Map/Generate package.

thematic2_en

A window will be opened, where we will have to indicate the folder where the package will be saved (the name will be created automatically). In our case, it has generated a package called ThematicMap-World_Countries-1-BN1.gvspkg.

Ready to be sent.

If you want to test it, this package and some other ones are available at the outreach website, in a section the objective of which is to be a catalogue with maps that are interesting for the users of this gvSIG extension and gvSIG Educa: http://outreach.gvsig.org/maps

By the way, if you want to contribute to feed this section, you only have to follow these instructions: http://outreach.gvsig.org/contribute

If you are the recipient of a Thematic map package and you are interested in the inverse process, converting the Thematic Map in a View (for changing its legend, edit it…) you only have to select the menu option: Thematic Map/Export to View

It will ask us for a file where the files will be saved (important: it must be empty), and it automatically will create the view equivalent to that thematic map.

That’s all for today… At the next post of this series we will see how to generate a package from a group of packages, that means, how to share groups of thematic maps in an only file.

Posted in english, gvSIG Desktop, gvSIG Educa | Leave a comment

Nombres de iconos, menus y acciones en gvSIG 2.0 III: convenios de nombrado.

En el articulo anterior, “Nombres de iconos, menus y acciones en gvSIG 2.0 II: aplicándolo en gvSIG.“, hemos visto como definir una acción y como usarla en menús y botones en la aplicación. Le hemos dado nombre a la acción, a su icono, hemos elegido un “action-command” y le hemos dado una posición. Ahora bien, a la hora de elegir estas cosas no lo he hecho de forma aleatoria, he seguido algunas pequeñas reglas que deberíamos seguir a la hora de hacerlo. Lo primero que tendríamos que pensar es que toda acción debe tener una entrada en los menús principales de gvSIG. Nunca debería haber una acción en un botón o menú contextual que no este representada en los menús. En nuestro ejemplo, hemos situado la acción en la entrada de menú:

  • Tools
    • Symbology
      • Import point symbols

La regla general para nombrar una acción seria la ruta completa en los menús, en inglés, separando las entradas de menús por “–“, reemplazando espacios por “–” y eliminando otros símbolos de puntuación que puedan haber. Así el nombre de la acción sera “tools-symbology-import-point-symbols“. Podría suceder que el nombre la acción entrase en conflicto con otra acción, por ejemplo, la entrada de menú:

  • Selection
    • Select all

Se usaría para seleccionar todas las filas de una tabla, o todos los elementos del mapa o las geometrías de la capa activa en la vista. Tendríamos tres acciones distintas, y lo que haríamos seria añadir un sufijo al final del nombre de la acción indicando sobre que objeto se aplica la acción. Así tendríamos:

  • selection-select-all-table
  • selection-select-all-layout
  • selection-select-all-layer

Siguiendo estas pequeñas consideraciones nombraremos a nuestra acción, y una vez tengamos el nombre de nuestra acción, pasaremos a nombrar el resto de elementos de la acción.

Deberemos elegir ahora el nombre usado para el “action-command“. Como regla general, usaremos el mismo nombre de la acción.

Lo siguiente que tendremos que seleccionar seria el nombre del icono. Seguiremos tres pequeñas reglas:

  • Si la acción esta contemplada entre las acciones recogidas por el proyecto Tango Desktop Project, de freedesktop.org se usara el nombre de icono que esta propone.
  • Si no se ha añadido a la acción un sufijo, se usara el nombre de la acción.
  • Si se ha añadido un sufijo a la acción, se usara el nombre de la acción eliminando el sufijo.

Por ultimo, deberemos asignar una posición a nuestra acción. En la versión 2 de gvSIG se ha establecido el siguiente convenio para establecer las posición de la acción:

AAABBBCCCD

Donde:

  • AAA, representa al menú de primer nivel dentro del menú de gvSIG. Se han establecido los siguientes valores:
    • 10 para el menú Archivo
    • 20 para el menú Edición
    • 30 para el menú Selección
    • 40 para el menú Mostrar
    • 50 para el menú Tabla
    • 60 para el menú Capa
    • 65 para el menú Vista
    • 70 para el menú Mapa
    • 90 para el menú Herramientas
    • 96 para el menú Ventana
    • 99 para el menú Ayuda
  • BBB, tres dígitos rellenos a ceros por la izquierda representando la posición dentro del menú AAA. En el caso en que no proceda indicaríamos “000”.
  • CCC, en caso de que la entrada en BBB sea un submenú, esta indica la posición dentro de este submenú. También va relleno a ceros por la izquierda, y en el caso de que no proceda indicaremos “000”.
  • D, en caso de que la entrada en CCC sea un submenú, esta indica la posición dentro de este submenú. En el caso de que no proceda indicaremos “0”.

Con estos valores compondríamos el valor de la posición, que sera usada para situar una acción respecto a otras siempre que se vayan a presentar al usuario.

En el caso del ejemplo la posición indicada es “900400200”:

  • 90, menú “Tools“
    • 040, submenu “Symbology“
      • 020, posición dentro del menú symbology de la entrada “Import point symbols“
        • 0, no procedería así que se deja un cero.

En gvSIG se han incluido una serie de herramientas que nos permiten ver la lista de acciones o las entradas de menús que están instaladas en un momento dado. Podemos ir a la opción de menú:

  • Tools
    • Devel
      • Show menú information

Para obtener un listado de las entradas de menú, en donde podemos ver su posición para hacernos una idea de donde debemos colocar la nuestra y que numero de posición tendríamos que asignarle.

En el mismo menú Devel, tenemos una opción “Show action information” que nos mostrara un listado de todas las acciones registradas en la aplicación ordenadas por plugin que las aporta.

Se puede obtener un listado de las acciones y entradas de menús de la aplicacion accediendo a el menu “Herremientas->development->Show actions information”

Posted in development, gvSIG Desktop, gvSIG development, spanish | Leave a comment

gvSIG 2.0: Japanese Symbol library

A really interesting aspect of the maps, and by extension of GIS, is the territory’s representation that humans beings do. The symbols used not only varies depending on the subject, but has also been modified over the time and in a particular moment differs depending on geographical or cultural aspects. A wide variety of symbologies, all of them with a common goal: representing what we see on a map.

For this reason and considering gvSIG expansion by the most diverse geographies of the planet, we created a new symbol library that we hope will be useful for Japanese gvSIG users.

This new library as usual, can be installed from the “Add-On Manager” of gvSIG 2.0.

Following the steps defined in the series of post “gvSIG 2.0: Create symbol libraries” we have created this new symbol library. Let’s see how we have made this library, so that it will be usefull as a new example for users to create their own.

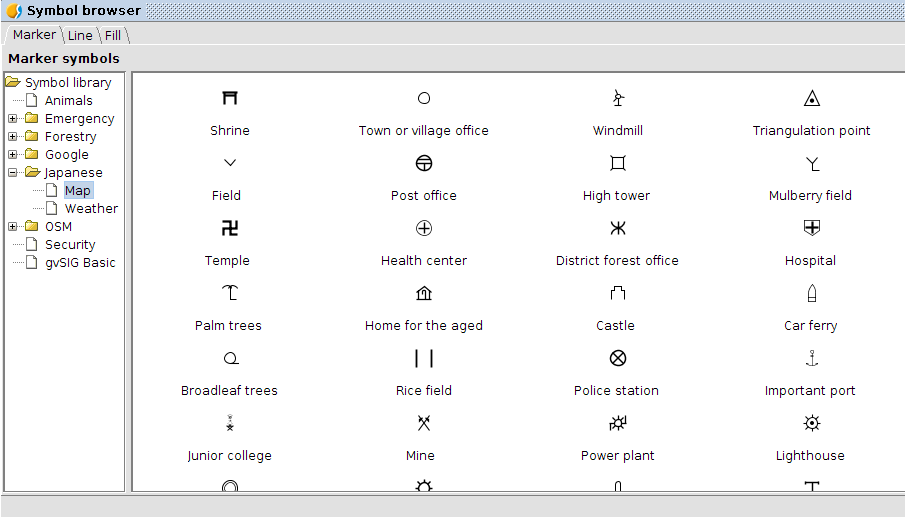
For point symbols (markers) we have used the series “Japanese Map Symbols” available from Wikimedia by the Geographical Survey Institute with a public domain license.Japanese_01

The following data source, also available from Wikimedia, is related to weather symbols used on Japanese maps, and provided by the Japan Meteorological Agency. Japanese_02In order to install the point symbols we used a specific symbol importer creating a new Symbol Library (called Japanese) comprising two subfolders (called Map and Weather).

Complementing the point symbols and also symbols used by Google Maps, we have also created both linear and brush symbols: Japanese_04Japanese_03

Now we only have to create the package as it was explained in this post.

You have this package available from the Add-On Manager (by selecting the URL http://downloads.gvsig.org/download/gvsig-desktop/ and searching for “Types / symbols“) or directly downloading it from here.

Posted in english, gvSIG Desktop | Tagged | Leave a comment

gvSIG 2.0: Biblioteca de símbolos “Crime”

Hace unas semanas publicábamos una biblioteca de símbolos orientada a la de gestión de emergencias, tanto a nivel urbano como de catástrofes naturales. De forma complementaría a esta y con el objetivo de facilitar la representación a los usuarios relacionados con el uso de gvSIG en criminología y análisis delictual, hemos generado una nueva biblioteca de símbolos.Crime01Crime_02 En este caso los símbolos de líneas y de relleno los hemos creado manualmente, utilizando para los símbolos puntuales como fuente la denominada “CMS.The Crime Mapping Symbology”.

Estos símbolos de dominio público fueron diseñados por el Departamento de Justicia de los Estados Unidos específicamente para cubrir las necesidades de simbología de los departamentos de policia, aunque por su temática también puede ser utilizados por otros cuerpos como bomberos. CMS engloba a su vez dos conjuntos de símbolos, denominados “Computer Aided Dispatch (CAD)” y “Records Management System (RMS)”.

Mediante GIMP hemos generado los distintos símbolos de selección. En este caso, al haber símbolos con tonalidades de amarillo, hemos decidido que los símbolos de selección se representen en escala de grises. Con Imagen/Modo/Escala de grises hemos convertido los símbolos a escala de grises, añadiendo “_sel” al nombre del fichero para que gvSIG lo interprete automáticamente.Crime03Estos símbolos están diseñados para utilizarse con un tamaño de 32 píxeles, aunque reduciendolo a tamaños inferiores también se visualizan correctamente.

Como es habitual, esta nueva biblioteca de símbolos está disponible desde el “Administrador de complementos” de gvSIG 2(seleccionando la URL http://downloads.gvsig.org/download/gvsig-desktop/  y buscando por “Tipos/symbols”) o directamente descargándoos el paquete desde aquí.

Posted in gvSIG Desktop, spanish | Tagged | 2 Comments

Nombres de iconos, menus y acciones en gvSIG 2.0 II: aplicandolo en gvSIG.

Hace un par de días empezamos una pequeñita serie de artículos relacionada con los nombres de iconos, menús y acciones con el articulo “Nombres de iconos, menús y acciones en gvSIG 2.0 (I)“, voy a continuar comentando algunas cosillas mas que pueden ser interesantes para los desarrolladores.

Cuando creamos un plugin para gvSIG, lo normal, es que queramos añadir alguna opción a los menús, o algún botón a la barra de botones de la aplicación. Para hacer esto deberemos hacerlo indicándolo en el fichero config.xml, al igual que lo hacíamos en versiones anteriores de gvSIG. Sin embargo en la versión 2 se ha introducido un concepto nuevo, el de acción.

Una acción, como su nombre indica, identifica una acción que el usuario puede realizar sobre gvSIG, sin estar ligada a un menú o botón de la barra de herramientas. Las acciones pueden ser invocadas o enlazadas desde cualquier parte de gvSIG, solo tenemos que saber su nombre. La acción lleva una serie de datos asociados:

  • Un nombre que la identifica de forma única dentro de todas las acciones registradas en la aplicación.
  • Una etiqueta, que puede ser utilizada para presentar esta, por ejemplo en un botón o en un menú contextual.
  • Un tip, con una pequeña descripción de lo que realiza la acción, para poder presentarlo en botones, o menús.
  • Un icono que la representa, para ser usado, por ejemplo, en botones.
  • Un acelerador de teclado asociado a la acción para el caso en que sea necesario.
  • Una posición absoluta respecto al resto de acciones.
  • Un código asociado a esta para calcular cuando debe estar visible o habilitada la acción o cual es el código asociado a la ejecución de la acción.

El disponer de esta información centralizada asociada a una acción nos permite que se presenten estas de forma homogénea no importa desde donde lo hagan. Siempre pueden tener la misma etiqueta o el mismo icono o el mismo acelerador o la misma posición respecto a otras acciones.

Así si queremos presentar la misma acción en un menú y un botón de la barra de botones solo tendremos que asociar la acción al menú o la barra y añadir el resto de opciones que precisen estos y que no están definidas en la acción.

La clase que representa la acción no puede ser sobreescrita por código. Se trata de una clase que ofrece andami como un servicio suyo, y el programador la puede utilizar, pero no sobrecargar… entonces… ¿ Como se aporta el código asociado a una acción ?

Para aportar el código asociado a una acción se utiliza el mecanismo de extensiones que ya existía en gvSIG en versiones anteriores. Una acción lleva asociado:

  • Un plugin que la contiene.
  • Una IExtension que aporta la lógica de esta.
  • Un action-command, para identificar la acción en la extensión.

Como configurar las acciones y menus

Para configurar las acciones, menús y botones de herramientas en gvSIG se usa el fichero config.xml. Este fichero tiene la configuración general de nuestro plugin; que extensiones lo componen, que acciones aportan, que menús, barras de herramientas y botones de estas.

Vamos a suponer que tenemos una extensión que nos permite importar imágenes de una carpeta como símbolos puntuales de gvSIG, y queremos añadir al menú Tools, submenu Symbology una entrada Import point symbols. Lo primero que tendríamos que hacer seria definir nuestra acción. Veamos como lo tendríamos que hacer. Nuestra acción tendría los siguientes atributos:

  • name, que tendrá el nombre de la acción, en nuestro caso la llamaremos “tools-symbology-import-point-symbols“.
  • label, que contendrá una etiqueta que represente a la acción. Esta etiqueta sera traducida al lenguaje en el que se encuentre gvSIG ejecutándose y deberá estar registrada en la BBDD de traducciones de la aplicación. En nuestro caso pondremos “_import_point_symbols“.
  • tooltip, con una pequeña descripción a usar como tip en donde proceda, pondremos “_import_images_from_folder_as_point_symbols“. Esta cadena también se traducirá antes de ser usada.
  • icon, aquí pondremos el nombre del icono a usar del tema de iconos que este cargado en gvSIG. Normalmente nuestra extensión, se encargara de registrar un icono por defecto en el tema de iconos con el nombre que aquí indiquemos. Pondremos “tools-symbology-import-point-symbols“
  • position, indicaremos la posición absoluta respecto al resto de acciones. Pondremos “900400200“.
  • accelerator, en donde indicaríamos que acelerador de teclado queremos asociar a esta acción. El formato para especificar el acelerador de teclado seria:

    modificador + tecla

    Sin espacios, donde modificador podría ser uno o varios de los siguientes separados por el carácter +:

    • CTRL
    • SHIFT
    • META
    • ALT

    Y las teclas serian:

    • Letras de la A a la Z
    • Números del 0 al 9
    • Cadenas de F1 a F12
    • La cadena DELETE.

    Para nuestro ejemplo no indicaremos ninguna tecla aceleradora, y para ello bastara con dejar el valor a “” o simplemente no especificar el atributo.

  • action-command, que sera el valor pasado a nuestra extensión cuando se invoque al método execute, en nuestro caso pondremos el mismo que dimos a nuestra acción, “tools-symbology-import-point-symbols“

Todo esto junto quedaría:

<action 
   name="tools-symbology-import-point-symbols" 
   label="_import_point_symbols"
   tooltip="_import_images_from_folder_as_point_symbols" 
   action-command="tools-symbology-import-point-symbols"
   icon="tools-symbology-import-point-symbols" 
   position="900400200" 
   accelerator="" 
/>

Una vez definida nuestra acción, ya podríamos usarla para asociarla a menús o botones. En nuestro caso habíamos pensado asociarla a un menú. Para hacer esto tendríamos que dar al menú el mismo nombre que la acción y luego bastaría con rellenar el atributo “text“. Quedaría algo como:

<menu
     name="tools-symbology-import-point-symbols" 
     text="tools/Symbology/Import_point_symbols"
/>

Si quisiésemos añadirla también a los botones podríamos crear una barra de herramientas y añadirle a ella el botón. Para añadir la barra de herramientas lo podríamos hacer con:

<tool-bar name="symbology" position="10">
  <action-tool name="tools-symbology-import-point-symbols" />
</tool-bar>

Con esto crearíamos la barra de herramientas “symbology” si esta no existiese, y le añadiría un botón con los datos de nuestra acción. Para ello basta con nombrar al botón igual que la acción que ya habíamos definido.

Las tres etiquetas que hemos visto deberían ir dentro de la la etiqueta que define nuestra extensión, “extensión“. Veamos como podría quedar nuestro “config.xml”

<?xml version="1.0" encoding="ISO-8859-1"?>
<plugin-config>
  <libraries library-dir="lib" />
  <depends plugin-name="org.gvsig.app" />
  <resourceBundle name="text" />
  <extensions>
    <extension
      class-name="org.gvsig.symbology.app.importsymbols.ImportSymbolsExtension"
      description="Import images from a folder as point symbols" 
      active="true">

      <action 
         name="tools-symbology-import-point-symbols" 
         label="_import_point_symbols"
         tooltip="_import_images_from_folder_as_point_symbols" 
         action-command="tools-symbology-import-point-symbols"
         icon="tools-symbology-import-point-symbols" 
         position="900400200" 
         accelerator="" 
      />
      <menu
           name="tools-symbology-import-point-symbols" 
           text="tools/Symbology/Import_point_symbols"
            />
    </extension>
  </extensions>
</plugin-config>
Posted in development, gvSIG Desktop, spanish | 1 Comment

gvSIG 2.0: the improvements we never talk about

We have said in more than one occasion that the main new feature of gvSIG 2.0 lies in the development side, new architecture, higher stability, easier maintenance, etc. We have also seen that the new line opened by gvSIG 2.0 is full of attractive improvements for the users, some of them originaly released and some others released in the last weeks: OSM, NetCDF, WMTS, Thematic maps, Symbols importer and libraries as OSM, Google, Forestry…

And everytime we talk about gvSIG 2.0 we forget the little improvements that has been appearing and that, as a whole, considerably improve what we usually call “the user experience”.

Let’s consider this post a tribute to some of this improvements that never appear in the headlines. We can find the first improvement just after executing the application. Many times we have desired that the gvSIG splash screen disappeared while the program is being loaded, as it didn’t let us see other opened programs. Well, now it is easy to do, clicking on the splash screen… it just disappear.

The first thing that users use to do after opening gvSIG is to create a View and add a layer. When creating a new View, we can see that it is automatically opened. When adding a layer we don’t have to select the driver of the file format that we want to add anymore, as by default it shows “all supported formats”. By the way, the load of the layers is done in background mode, what allows to use the application in the meanwhile. In addition, we can see that the status bar informs about the load process and possible fails.

Menus and submenus have been reorganized according to standards used in most of the software applications. And we finally have the buttons, not only ordered, but always in the same position (they don’t get moved “magically” anymore).

In the same line of usability we have unified all the geoprocesses in an only framework, adding to it those relative to raster tools.

And talking about raster we find that it has been considerably improved the info by point window when querying a raster layer loaded in the view. 00_01

We also have improvements in the WMS side: now the WMS layers legends are shown in the Table of Contents (in case the service provides it, of course, like for example in the case of the Spanish Cadastre WMS).

We can find another attractive improvement when using the view pan tool: now we can better control the movement as we can see the original view extent in a semitransparent mode.

With no doubt, you are going to discover more improvements as you keep using the application, some more visible, like the new buttons in the table toolbar that provides a fast access to some tools (add, rename and remove column; add and remove record) or those that make more dynamic the vector edition, and other more difficult to find, like for example the fact that gvSIG project files now are saved with relative paths by default.

Posted in english, gvSIG Desktop | Tagged | 1 Comment